
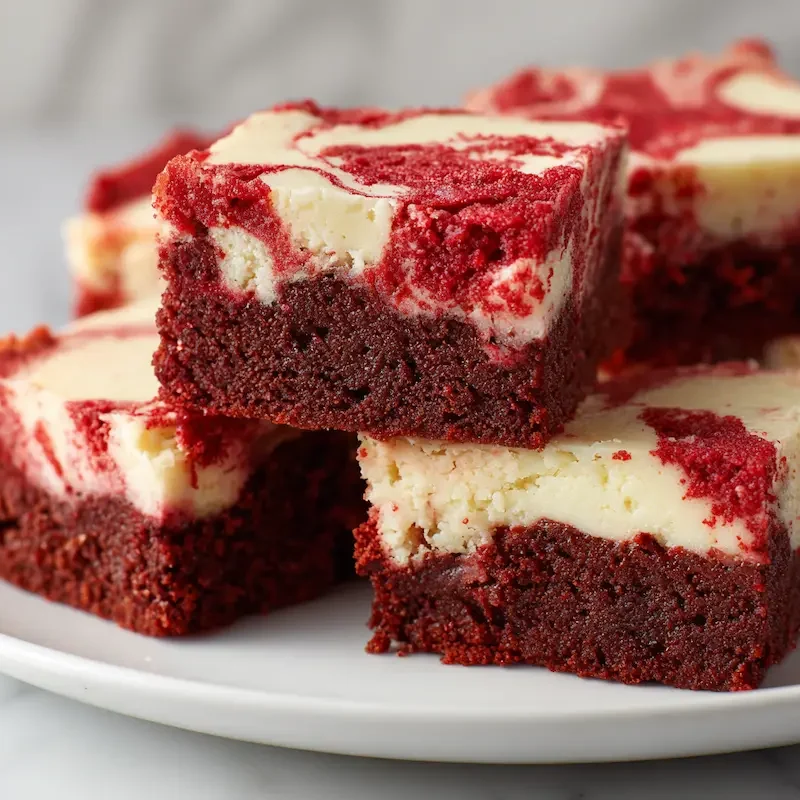
These red velvet cheesecake brownies combine rich chocolate flavor with a tangy cream cheese swirl. Perfect for Valentine’s Day, holidays, or any time you want a stunning and delicious treat!
A Love Letter to Red Velvet Cheesecake Brownies
There’s something about red velvet that just feels like a warm hug in dessert form. Add a creamy swirl of cheesecake, and it becomes the kind of treat that makes people close their eyes after the first bite. These Red Velvet Cheesecake Brownies have become a bit of a tradition in our home—especially when Valentine’s Day rolls around.
Back when my kids were younger, I baked these for the first time as a surprise for my husband. He’s a “not-too-sweet” dessert kind of guy, but that first batch disappeared faster than I expected. By the next year, Lily had claimed swirling duty, Noah became the official taste tester (he takes this role very seriously), and Emma… well, Emma just wanted to lick the bowl.
Now, every February, we make a big tray of these festive red velvet treats, wrap up a few in parchment and red string, and tuck them into lunchboxes or deliver them to neighbors. They’re part of our Valentine’s dessert routine—right up there with love notes and pink construction paper hearts.
Eva’s Note: These brownies also made the cut in our Valentine’s dessert roundup — they’re that good.
Why You’ll Love These Brownies
There’s a lot to love about these Red Velvet Cheesecake Brownies—and not just because they look like they belong in a bakery window. They’re the kind of treat that delivers on every level: taste, texture, and that eye-catching swirl.
You get the deep, slightly tangy cocoa flavor of classic red velvet, baked into a rich, fudgy brownie base. Then comes the velvety cheesecake layer—light, creamy, and just the right amount of sweet. The two swirl together like a dessert dance: red and white ribbons marbled into every bite.
They’re just as perfect on a holiday table as they are packed in a lunchbox or passed around at a potluck. And yes—they always earn compliments (and recipe requests!).
Here’s what makes them a favorite:
- Rich and fudgy red velvet base
- Tangy, creamy cheesecake swirl on top
- Pretty marbled finish for a showstopping look
- Easy to make with pantry basics
- Festive and versatile for holidays, birthdays, or anytime
If you love other vibrant velvet treats, this one definitely deserves a spot in your recipe box.
Ingredients You’ll Need
This recipe for Red Velvet Cheesecake Brownies keeps things simple—no fancy ingredients or hard-to-find items. Most of what you need is probably already in your pantry or fridge. And if you’re anything like me, you’ve got a backup block of cream cheese hiding behind the pickles (because cheesecake cravings are real).
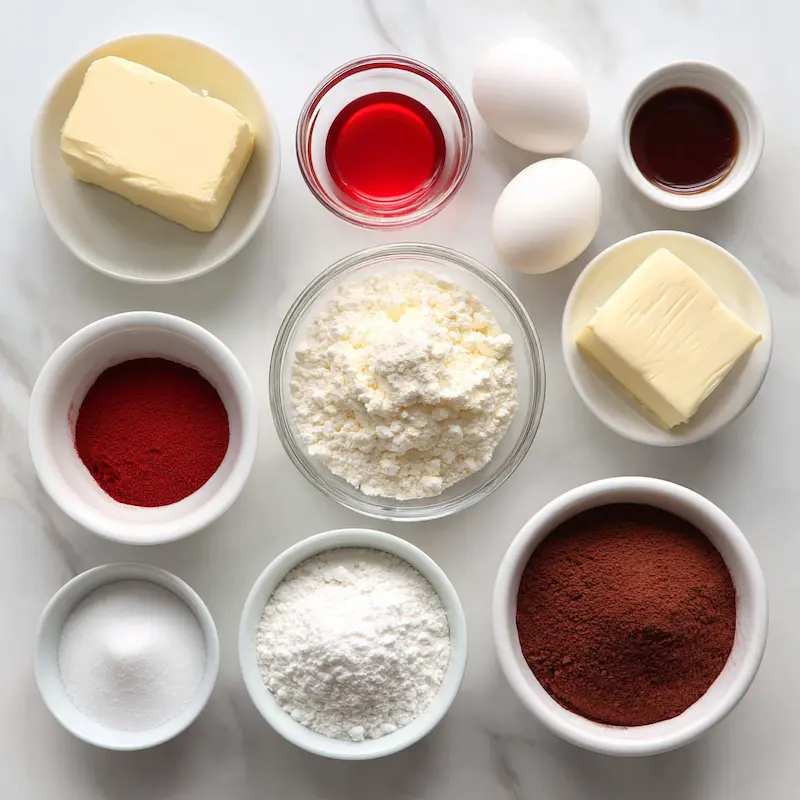
Here’s what you’ll need:
For the red velvet layer:
- ½ cup (1 stick) unsalted butter, melted
- 1 cup granulated sugar
- 2 large eggs
- 1 tsp vanilla extract
- 1 tbsp red food coloring
- 1 tsp white vinegar
- ¼ cup unsweetened cocoa powder
- ⅔ cup all-purpose flour
- ¼ tsp salt
For the cheesecake layer:
- 8 oz cream cheese, softened
Eva’s tip: Let it sit out at room temp—cold cream cheese clumps! I usually set mine out after breakfast so it’s ready by baking time. - ¼ cup powdered sugar
- 1 egg
- ½ tsp vanilla extract
I usually go with store-brand basics for the dry goods, but I do spring for a good block-style cream cheese (I’ve had the best results with Philadelphia’s full-fat kind). Avoid whipped or tub-style—it just doesn’t bake the same.
Step-by-Step Instructions
Making Red Velvet Cheesecake Brownies is easier than you might think—and honestly, it’s one of those recipes that feels a little magical when the swirls come together. The red and white contrast is so striking, and it looks like you spent hours on them (you didn’t).
Get your kids involved if you can—Emma always begs for the swirling job, and it’s a sweet way to let little hands help. Plus, you really can’t mess it up. Swirly means love, right?
Here’s how to make cheesecake brownies that are as pretty as they are delicious:
1. Preheat and Prep
Preheat your oven to 350°F (175°C).
Line an 8×8-inch baking pan with parchment paper, leaving some overhang on the sides.
Eva’s Note: Lining the pan is key. It makes lifting and slicing a breeze—you’ll get those clean, crisp edges we all fight over.
2. Make the Red Velvet Brownie Layer
In a medium bowl, whisk together:
- ½ cup melted butter
- 1 cup granulated sugar
- 2 eggs
- 1 tsp vanilla extract
- 1 tbsp red food coloring
- 1 tsp white vinegar
Once smooth, sift in:
- ¼ cup unsweetened cocoa powder
- ⅔ cup all-purpose flour
- ¼ tsp salt
Stir gently until just combined.
Tip: Don’t overmix! Once the flour is in, stop stirring when it’s just barely blended. Overmixing makes them cakier instead of fudgy.
Pour most of the batter into your prepared pan—save about ¼ cup for later. Smooth it into an even layer with a spatula.
3. Make the Cheesecake Layer
In another bowl, beat together:
- 8 oz softened cream cheese
- ¼ cup powdered sugar
- 1 egg
- ½ tsp vanilla extract
Mix until completely smooth and creamy.
Gently spread the cheesecake mixture over the red velvet layer in the pan.
4. Swirl to Your Heart’s Content
Drop spoonfuls of the reserved red velvet batter on top of the cheesecake layer.
Use a toothpick or knife to swirl the batters together—gently dragging it in figure-eights across the surface.
Eva’s Note: Swirling is oddly satisfying, and no two pans ever look the same. It’s like dessert art!
Need some swirl inspo? Try these tips from our swirling cheesecake into festive designs post.
5. Bake
Bake for 28–32 minutes, or until the edges are set and the center only slightly jiggles when you gently shake the pan.
Let cool completely in the pan, then lift out using the parchment overhang.
6. Chill, Slice, Serve
Once cool, pop the whole tray in the fridge for 30–60 minutes. This helps the cheesecake set and makes slicing way easier.
Cut into squares or bars and serve!
Tips for Fudgy, Picture-Perfect Brownies
I’ve made these Red Velvet Cheesecake Brownies more times than I can count—especially around Valentine’s Day—and trust me, a few simple tweaks can make the difference between pretty good and oh wow, did you make these?! I’ve had my share of brownie flops too (overbaked edges, weird textures, clumpy cheesecake), but each one taught me something helpful.
If you’re after fudgy centers, creamy swirls, and clean edges that look like they came from a bakery box, these red velvet brownie tips will get you there.
- Don’t overmix the batter
Once the flour hits the bowl, stir just until everything’s combined. Overmixing introduces too much air—and that leads to cakier brownies. - Room temp cream cheese = smooth swirls
Cold cream cheese gets clumpy, no matter how much you mix. I usually take it out in the morning so it’s ready when I bake after lunch. - Line your pan with parchment
This one’s a game-changer. You’ll be able to lift the whole slab out cleanly and get those nice, sharp edges for serving or gifting. - Use a toothpick to swirl
Knives work too, but a toothpick gives you more control—especially if your kids want to help. - Chill before slicing
I know, it’s hard to wait. But chilling firms up the cheesecake and helps you get neat, bakery-style cuts without smearing the swirl.
Eva’s Note: I’ve also found that these brownies look especially striking next to other red-and-white desserts like our chocolate-covered strawberry cake. Perfect for a dramatic dessert table!
Storing & Serving Ideas
One of the best parts about Red Velvet Cheesecake Brownies—aside from how good they taste—is how beautifully they store. You can make them ahead of time, slice them cleanly, and have them ready for gifting, parties, or late-night cravings (no judgment here).
They also hold their shape and texture well, which makes them perfect for stacking in little bakery boxes or wrapping in wax paper for a sweet, homemade gift.
How to Store:
- Refrigerate in an airtight container for up to 4 days.
I usually keep them in a glass container with a snap-on lid, and they’re even better the next day as the flavors deepen. - Chill before slicing for the neatest edges.
Eva’s Tip: “I once cut a square at midnight while wrapping school lunches—and it was even better cold!”
Can You Freeze Cheesecake Brownies?
Absolutely! These brownies freeze like a dream.
- Let them cool completely.
- Slice into squares.
- Wrap each one tightly in plastic wrap or parchment.
- Place in a zip-top freezer bag and freeze for up to 2 months.
To serve, just thaw overnight in the fridge. They’ll taste just as fudgy and festive as the day you baked them.
Eva’s Note: I always stash a few extras in the freezer “just in case”—because surprise sweet cravings are real, and these hit the spot every time.
Variations to Try
While I’m pretty loyal to the classic Red Velvet Cheesecake Brownies, there have been plenty of times my kids (or my curiosity) pushed me to try something new. Brownies are one of those desserts that welcome creativity—especially when it comes to flavors, mix-ins, or that creamy top swirl.
These tweaks can turn a familiar favorite into something fresh without losing the magic of what makes these brownie cheesecake bars so loved.
Here are a few fun variations you can try:
- Chocolate chip swirl
Stir a handful of mini chocolate chips into the cheesecake layer before swirling—Emma’s idea, and a good one! - Raspberry swirl
Add a few drops of raspberry jam on top of the cheesecake layer and swirl it in with the red velvet. It’s tart, sweet, and gorgeous. - Nutty crunch
Sprinkle chopped walnuts or pecans between the layers before baking. Adds great texture and a toasty flavor. - Oreo bottom crust
Crush some Oreos and press them into the bottom of the pan before adding the brownie batter. Rich and delicious. - Double cheesecake
Double the cheesecake layer ingredients if you love that tangy swirl to really shine. Just extend the baking time by a few minutes.
Eva’s Tip: Whatever variation you choose, always stick with a full-fat block-style cream cheese for the best texture and flavor. It truly is the best cream cheese for brownies—worth it every time.
Frequently Asked Questions about Red Velvet Cheesecake Brownies
Let’s be honest—when a recipe becomes part of your rotation (especially for special occasions), you start wondering all the what-ifs. Can I make it ahead? Will it freeze? What’s the best cream cheese? Trust me, I’ve asked all those too. So here’s everything I’ve learned, tested, and taste-tested (with help from my very willing family) about these Red Velvet Cheesecake Brownies.
Q: Can I make these red velvet cheesecake brownies ahead of time?
A: Yes! In fact, they’re even better after resting overnight. Store them in an airtight container in the fridge for up to 4 days. The cheesecake layer firms up, the flavors deepen, and slicing is a breeze.
Eva’s Note: I’ve totally sliced one cold from the fridge while packing school lunches at 6:30 a.m.—and it was the best part of my morning.
Q: What’s the best cream cheese for cheesecake brownies?
A: Stick with full-fat block cream cheese. Avoid whipped or spreadable tubs—they’re too soft and won’t set properly. My go-to is Philadelphia original (I buy it in bulk during baking season).
Eva’s Tip: You’ll get the creamiest swirl and best flavor with block-style cream cheese—no shortcuts here.
Q: Can I freeze cheesecake brownies?
A: Yes! Once cooled, slice them into bars, wrap each one tightly in plastic or parchment, and freeze in a zip-top bag for up to 2 months. Thaw in the fridge overnight before serving.
Eva’s Note: I always stash a few “emergency brownies” in the freezer—because future-you deserves something sweet too.
Q: Do I need vinegar in red velvet brownies?
A: You do! The vinegar reacts with the cocoa powder and helps bring out that signature tangy red velvet flavor. It also deepens the red color.
Eva’s Story: One time I forgot it completely… and yep, the color was dull and the flavor was missing that classic red velvet pop. Never skipping it again!
That wraps up our cozy little journey through one of my favorite festive red velvet treats. Whether you’re baking them for a Valentine’s dessert, a holiday gathering, or just because Tuesday needs something sweet, I hope these brownies bring as much joy to your kitchen as they do to mine.
Thanks for baking with me!
Print
Red Velvet Cheesecake Brownies – Fudgy, Festive, and Swirled with Creamy Delight
- Total Time: 45 minutes
- Yield: 16 brownies 1x
Description
Fudgy red velvet brownies swirled with tangy cream cheese for a beautiful, festive treat perfect for Valentine’s Day or any special occasion.
Ingredients
For the red velvet layer:
½ cup (1 stick) unsalted butter, melted
1 cup granulated sugar
2 large eggs
1 tsp vanilla extract
1 tbsp red food coloring
1 tsp white vinegar
¼ cup unsweetened cocoa powder
⅔ cup all-purpose flour
¼ tsp salt
For the cheesecake layer:
8 oz cream cheese, softened
¼ cup powdered sugar
1 egg
½ tsp vanilla extract
Instructions
1. Preheat oven to 350°F (175°C) and line an 8×8-inch baking pan with parchment paper.
2. In a bowl, whisk together melted butter, sugar, eggs, vanilla, red food coloring, and vinegar.
3. Sift in cocoa powder, flour, and salt. Stir gently until just combined.
4. Reserve ¼ cup of the red velvet batter. Pour the rest into the prepared pan and smooth the top.
5. In a separate bowl, beat softened cream cheese, powdered sugar, egg, and vanilla until smooth.
6. Spread the cheesecake mixture over the red velvet base in the pan.
7. Drop spoonfuls of the reserved red velvet batter on top and swirl with a toothpick or knife.
8. Bake for 28–32 minutes or until the center is just set and edges are slightly firm.
9. Cool completely in the pan, then refrigerate for at least 30 minutes before slicing.
10. Cut into squares and serve chilled or at room temperature.
Notes
For best results, use full-fat block-style cream cheese and avoid whipped or spreadable types.
Chilling the brownies before slicing helps create clean, neat squares.
Store leftovers in the fridge for up to 4 days, or freeze individual pieces for up to 2 months.
Don’t overmix the brownie batter—this helps them stay fudgy instead of cakey.
- Prep Time: 15 minutes
- Cook Time: 30 minutes
- Category: Dessert
- Method: Baking
- Cuisine: American
Nutrition
- Serving Size: 1 brownie
- Calories: 210
- Sugar: 18g
- Sodium: 110mg
- Fat: 12g
- Saturated Fat: 7g
- Unsaturated Fat: 4g
- Trans Fat: 0g
- Carbohydrates: 24g
- Fiber: 1g
- Protein: 3g
- Cholesterol: 50mg