
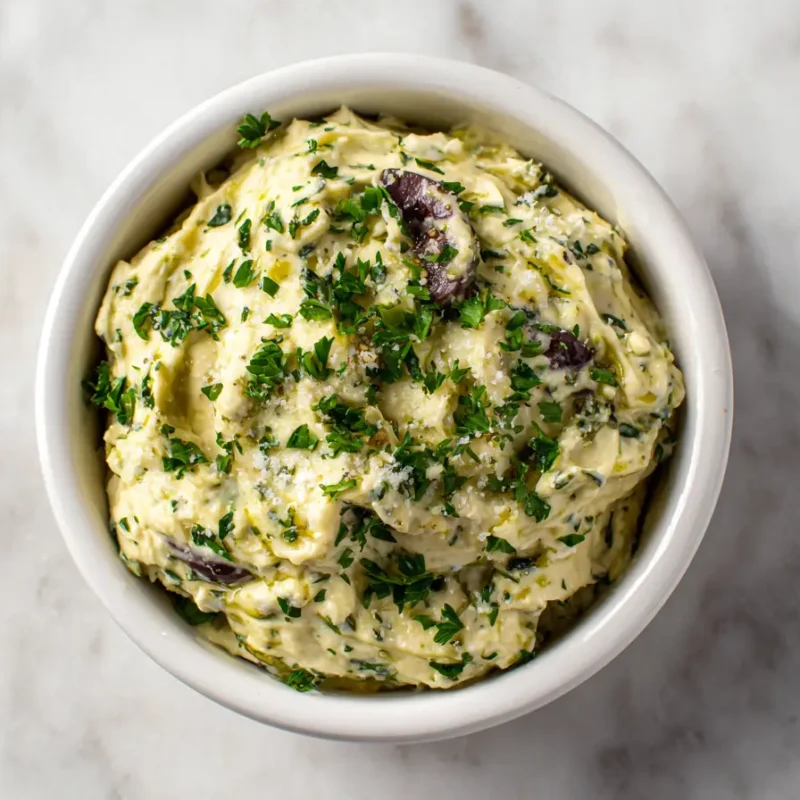
I have made a lot of dips in my life, but Olive Lovers Dream Dip is the one that makes people hover near the bowl like it’s giving out secrets. The first time I served it for family movie night, I set it down with a stack of toast points and some crunchy cucumbers. By the time the opening credits rolled, the dip bowl was basically scraped clean, and Noah (my honest little taste tester) said, “Mom, this olive dip tastes expensive.” I’ll take it.
It’s briny olives, a creamy base, and that little punch of garlic that makes you go back for “just one more.” It’s also a crowd pleaser appetizer because it’s no-cook, fast, and flexible. Put it on a snack board, swipe it on toast, or call it one of your new favorite movie night snacks.
If your snack board needs one ‘wow’ dip, this is it.
If you love dip nights, you’ll also want my other party dips.
Why This Olive Dip Works (Flavor + Texture in One Bowl)
This is the dip I make when I want something that feels a little fancy, but I do not want to cook, babysit the oven, or wash five pans afterward. It’s my hostess safety net because it’s reliable, bold, and somehow tastes even better after it sits for a bit.
The magic is in the balance. You get the deep, winey brine from Kalamata olives and the brighter, buttery bite of green olives. Then cream cheese makes it rich, sour cream (or Greek yogurt) adds tang, and mayonnaise smooths everything out so it scoops like a dream. Add garlic, Parmesan, and herbs and suddenly you’ve got a garlic parmesan dip that feels like it belongs at a party, not just in your fridge next to leftover takeout containers.
- What you’ll taste: briny and savory
- What you’ll taste: creamy and tangy
- What you’ll taste: herby and fresh
- What you’ll taste: lemony and bright
And because it’s an easy cold dip, you can make it ahead, tuck it in the fridge, and feel like you have your life together for at least one day. If you’re craving something warm instead, I also love this cheesy baked dip for when you want something hot and bubbly.
Best Olives to Use (And How to Balance Salt + Tang)
Let’s talk olives, because the olives really are the whole point here. This dip can lean “too salty” fast if you grab whatever is on sale and dump it in without tasting. I learned that the hard way years ago, standing in a tiny apartment kitchen (back when we first moved to the city), trying to fix a dip that tasted like the ocean in the least charming way.
Here’s what I do now. I taste one Kalamata and one green olive before I add anything else. If they’re super salty, I know to go easy on any extra salt (spoiler, this recipe does not even need added salt most days). If they’re mild, I know Parmesan will bring enough savory flavor without pushing it over the edge.
This dip also lands in that “Mediterranean appetizer dip” zone, the kind of briny, herby, lemony snack that makes you want to add cucumbers, tomatoes, and warm bread to the plate. If you’ve ever loved an olive tapenade dip, this is like its creamier, friendlier cousin.
Kalamata + Green: The Dream Team
Using two kinds of olives is what gives this dip that layered, snack-board-worthy flavor. It’s not just salty. It’s briny, bright, and a little buttery all at once, which is exactly what you want in a kalamata olive dip and green olive dip combo.
- Kalamata olives add: deep brine, rich flavor, that classic “tapenade” vibe
- Green olives add: a lighter bite, a buttery tang, and balance
- Together: a two-note flavor that tastes more interesting than either one alone
Quick Prep That Makes a Big Difference
This is the tiny step that keeps the dip from turning watery on the snack board. Olives hold onto brine, and that extra liquid can make your dip too loose.
- Check for any sneaky pits, even if the jar says pitted
- Drain the olives well
- Pat them dry with paper towels
- Chop to your preferred texture (small dice for scoopable, finer for spreadable)
If you want a thicker dip, this drying step is your best friend. It’s not glamorous, but it works.
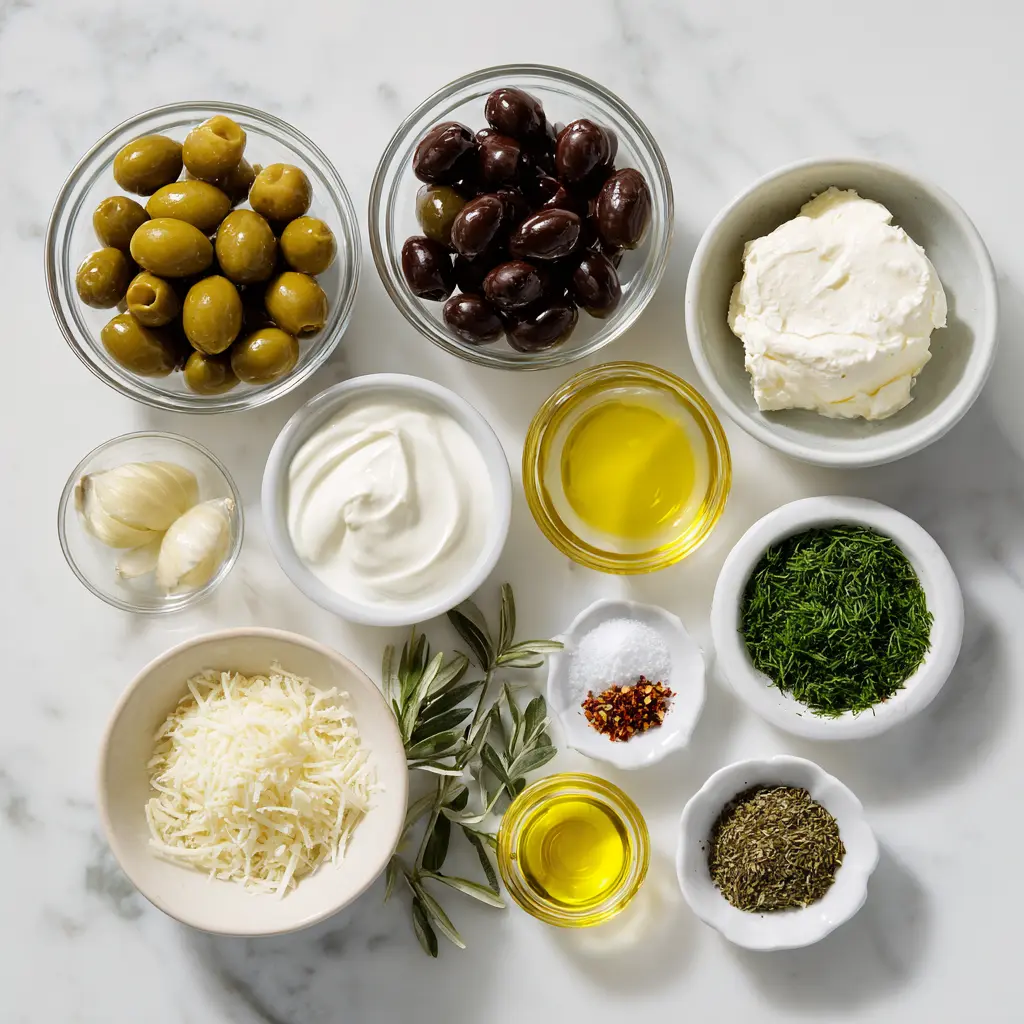
Ingredients You’ll Need
This is a simple bowl of ingredients, but each one has a job. The olives bring the briny punch, the dairy brings the creamy comfort, and the lemon and herbs keep it from feeling heavy. Also, quick tip from my real-life messy counter: zest your lemon first, then juice it. Zest gives you that lemony sparkle without making the dip runny.
- 1 cup Kalamata olives, pitted
- 1 cup green olives, pitted
- 8 oz cream cheese, softened (the creamy, rich base for this cream cheese olive dip)
- 1/2 cup sour cream or plain Greek yogurt (tang and softness)
- 1/4 cup mayonnaise (helps it stay silky and scoopable)
- 2 cloves garlic, minced (the bold “one more bite” factor)
- 2 tbsp olive oil (rounds out the flavor)
- 1 tbsp lemon juice (brightness)
- 1 tsp lemon zest (bright flavor without thinning)
- 1/4 cup Parmesan cheese, grated (salty-savory depth for that garlic Parmesan dip vibe)
- 2 tbsp fresh parsley, chopped (freshness)
- 1 tbsp fresh dill or oregano (optional), chopped (extra herby finish)
- 1/2 tsp black pepper
- 1/4 tsp red pepper flakes (optional)
Those herbs are what push it into true herbed olive dip territory, so if you have them, do not skip them.
How to Make Olive Lovers Dream Dip (Step-by-Step)
I make this dip in whatever season of life I’m in. Some weeks I’m organized and I use the food processor. Other weeks I’m tired and I just chop and stir while Emma asks to “taste test” every two minutes. Both ways work.
- Prep the olives. Drain, then pat the Kalamata and green olives dry with paper towels. Rough chop them (or set them aside if you’re blending smooth).
- Mix the creamy base. In a medium bowl, stir together the softened cream cheese, sour cream (or Greek yogurt), and mayonnaise until smooth.
Eva’s Tip: If your cream cheese is still a little cold, let it sit on the counter for 20 to 30 minutes. It mixes faster and you won’t end up with little cream cheese lumps hiding in the dip.
- Add the flavor builders. Stir in the minced garlic, olive oil, lemon juice, lemon zest, Parmesan, parsley, dill or oregano (if using), black pepper, and red pepper flakes (if using).
- Add the olives. Fold in the chopped olives until evenly distributed.
- Taste and adjust. Taste the dip before adding anything else. Depending on your olives and Parmesan, you may not need more salt at all. If you want more brightness, add a tiny squeeze of lemon. If you want more herb flavor, add another pinch of parsley or dill.
Eva’s Tip: Do the “cracker scoop test.” If it holds its shape on a cracker without sliding off, you’re in perfect snack board dip territory.
- Chill (recommended). Cover and refrigerate for at least 1 hour for the best flavor.
- Serve. Stir once more, then serve with crackers, toast points, veggies, or as a dip for toast.
If you’re building a whole dip situation, here’s another easy dip that’s perfect for snack boards.
Choose Your Texture: Chunky Chopped or Smooth Whipped
This is where you get to choose your own dip adventure. I’ve learned that texture depends on the crowd. Adults tend to love big olive bits. Kids (and some toast lovers) prefer it smoother. And yes, you can blend smooth or keep it chunky.
- Chunky:
- Chop olives by hand (small dice).
- Fold them into the creamy base.
- Best for crackers, pita chips, and a snack board dip with lots of little toppings.
- Smooth:
- Use a food processor to pulse the olives until finely chopped.
- Blend with the creamy base until whipped and spreadable.
- Best as a dip for toast, bagels, sandwiches, and wraps.
If you’re unsure, go medium chop. Scoopable, but still textured.
Chill Time (When It Tastes the Best)
This dip is good right away, but it gets better after a rest. The garlic calms down a bit, the herbs wake up, and the lemon feels like it moved in and made friends.
- Right now: bold, briny, very snackable
- After 1 hour: more balanced, more “party dip” energy
- Overnight: the best flavor meld, true make-ahead party dip status
Before serving, let it sit out for 10 minutes so it softens and scoops easily.
Serving Ideas (Beyond Crackers)
If you’re anything like me, you want a dip to do more than just sit next to a sad sleeve of crackers. This one can carry a whole spread. On movie nights, I like to build a little “choose your own bite” plate, something crunchy, something fresh, something warm, and something sweet.
- Crunchy: pita chips, pretzel thins, toasted baguette slices, toast points
- Fresh: cucumber rounds, bell pepper strips, carrot sticks, cherry tomatoes
- Hearty: warm flatbread, mini bagels, tortilla wedges, baked potatoes (yes, dollop it on top)
- Leftover upgrades: spread on a sandwich, tucked into a wrap, stirred into warm pasta, spooned over roasted veggies
For a party table lineup, I’d pair it with a fun, crowd-friendly dip to round out a party spread. Two dips always feel like a plan.
And if you’re serving this as a Mediterranean appetizer dip, add grapes or sliced apples on the side. That sweet bite next to the briny dip is so good.
Flavor Variations (Make It Yours)
I like to keep one bowl “classic” and then tweak a second bowl if I’m feeding a mixed crowd. I’ve literally labeled them with sticky notes before, because it’s New York, my kitchen is loud, and people grab first and ask questions later.
- Extra-herby: Add 1 to 2 tbsp extra chopped parsley and dill or oregano. This turns it into a true herbed olive dip that tastes garden-fresh.
- Spicy: Add an extra 1/2 tsp red pepper flakes, or more to taste. Great for game night.
- Lemon-forward: Add 1/2 tsp extra lemon zest right before serving for a brighter finish.
- More “tapenade” style: Chop the olives finer, add an extra drizzle of olive oil, and bump the herbs. It leans into olive tapenade dip territory, but still creamy and scoopable.
Troubleshooting (Too Salty, Too Loose, Too Strong)
I have had a “save the dip” moment more than once, usually 20 minutes before someone rings the doorbell. The good news is this dip is forgiving. Taste, then adjust. Small changes make a big difference.
- Problem: Too salty. Fix: Stir in a little more cream cheese or sour cream to dilute the salt. A tiny squeeze of lemon can also help balance the saltiness.
- Problem: Too loose or watery. Fix: Chill it for 30 to 60 minutes. Cold firms it up. Next time, pat the olives dry first, it’s the tiny step that prevents this.
- Problem: Too garlicky. Fix: Let it chill for an hour. Garlic calms down as it sits. If it’s still too strong, add a bit more cream cheese to mellow it.
- Problem: Too thick to scoop. Fix: Let it sit at room temperature for 10 to 15 minutes, then stir. If needed, loosen with a small spoonful of sour cream or Greek yogurt.
Make-Ahead, Storage, and Leftover Ideas
This is one of those dips that makes you feel prepared, even if your day is chaos. I love having a little bowl in the fridge to snack from while I’m cooking dinner, usually with a cucumber in one hand and a spoon in the other.
Make-ahead: Mix it up and chill for at least 1 hour. Overnight is even better. This is truly a make-ahead party dip that takes pressure off party day.
Store: Keep in an airtight container in the fridge. Stir before serving. If it firms up, let it sit out for 10 to 15 minutes so it softens.
Leftovers: Spread it on toast for a quick lunch, tuck it into wraps, dollop onto baked potatoes, or stir a spoonful into warm pasta for a creamy, briny sauce moment.
Frequently Asked Questions about Olive Lovers Dream Dip
Q: How long does Olive Lovers Dream Dip last in the fridge?
Answer: Stored in an airtight container, it keeps well for about 3–4 days. Give it a good stir before serving, and if it seems a bit firm straight from the fridge, let it sit at room temperature for 10–15 minutes to soften and taste its best. The next-day toast moment is real, the flavors feel even more blended.
Q: Can I make Olive Lovers Dream Dip ahead of time for a party?
Answer: Yes, making it ahead is ideal. Mix it up, cover, and chill for at least 1 hour (overnight is great) so the garlic, lemon, and herbs have time to mingle. Before serving, stir and taste, then brighten with a pinch of zest or a squeeze of lemon if needed. I almost always make it the night before so party day feels calmer.
Q: Can I substitute Greek yogurt for sour cream in Olive Lovers Dream Dip?
Answer: Yes. Greek yogurt gives a slightly tangier, lighter finish while still keeping the dip creamy. Choose plain, thick Greek yogurt for the best texture, and taste at the end since tang levels can vary by brand. I decide based on what’s already in my fridge that week.
Q: How do I make olive dip thicker if it turns out too loose?
Answer: First, make sure the olives are well-drained and patted dry before mixing. If the dip is already made, chill it for 30–60 minutes, cold firms it up. You can also stir in a bit more softened cream cheese or a spoonful of grated Parmesan to tighten the texture without changing the flavor direction. I do a quick scoop test with a cracker to see if it holds.
Q: Can I keep Olive Lovers Dream Dip warm in a slow cooker, and for how long?
Answer: You can keep it warm on the low or warm setting for about 1–2 hours, stirring occasionally so it heats evenly. If it starts to look oily or separated, turn the heat down and stir well, gentle heat works best for maintaining a creamy texture. I love serving it warm for a cozy game night when everyone keeps circling back for one more bite.
Q: What’s the best way to reheat olive dip (if serving warm)?
Answer: Reheat gently. Warm it in short intervals, stirring between each, until just heated through. Avoid high heat, which can cause the dip to separate. If it thickens too much as it warms, stir in a small spoonful of sour cream or Greek yogurt to loosen it back up. You’ll smell the moment the garlic and herbs get stronger as it warms.
Q: Should I blend this dip smooth or keep it chunky?
Answer: Either works, it depends on how you’re serving it. Chunky is great for scooping with crackers and building snack boards because you get little pops of olive in every bite. Smooth is ideal for spreading on toast, bagels, or sandwiches. If unsure, go for a medium chop so it’s scoopable but still textured. My two-bowl trick for gatherings is one smooth for toast points, one chunky for crackers.
Q: What should I serve with olive dip besides crackers?
Answer: Try toast points, pita chips, cucumber rounds, bell pepper strips, carrot sticks, cherry tomatoes, or warm flatbread. It’s also great as a sandwich spread, a wrap filling, stirred into warm pasta, or dolloped on baked potatoes and roasted veggies. My favorite snack-board combo is toast points plus cucumbers plus a handful of grapes.
Whether you’re building a snack board dip for friends or just need something easy to nibble on while life happens, this Olive Lovers Dream Dip is the kind of recipe that makes the day feel a little more delicious. Keep it in your back pocket for parties, movie nights, and those “I need a win” afternoons when a dip for toast is basically self-care.
Thank you for cooking with me, it means more than you know.
Come hang out with me on Pinterest for more cozy, family-friendly recipes.
Print
Olive Lovers Dream Dip – Creamy Party Appetizer
- Total Time: 10 minutes
- Yield: 8 servings 1x
- Diet: Vegetarian
Description
Olive Lovers Dream Dip is a creamy, garlicky blend of Kalamata and green olives, cream cheese, Parmesan, and herbs. Perfect for toast, crackers, and snack boards.
Ingredients
1 cup Kalamata olives, pitted
1 cup green olives, pitted
8 oz cream cheese, softened
1/2 cup sour cream or plain Greek yogurt
1/4 cup mayonnaise
2 cloves garlic, minced
2 tbsp olive oil
1 tbsp lemon juice
1 tsp lemon zest
1/4 cup Parmesan cheese, grated
2 tbsp fresh parsley, chopped
1 tbsp fresh dill or oregano (optional), chopped
1/2 tsp black pepper
1/4 tsp red pepper flakes (optional)
Instructions
1. Prep the olives. Drain, then pat the Kalamata and green olives dry with paper towels. Rough chop them.
2. Mix the creamy base. In a medium bowl, stir together the softened cream cheese, sour cream (or Greek yogurt), and mayonnaise until smooth.
3. Add the flavor builders. Stir in the minced garlic, olive oil, lemon juice, lemon zest, Parmesan, parsley, dill or oregano (if using), black pepper, and red pepper flakes (if using).
4. Add the olives. Fold in the chopped olives until evenly distributed.
5. Taste and adjust. Taste the dip before adding anything else. Depending on your olives and Parmesan, you may not need more salt at all. If you want more brightness, add a tiny squeeze of lemon. If you want more herb flavor, add another pinch of parsley or dill.
6. Chill (recommended). Cover and refrigerate for at least 1 hour for the best flavor.
7. Serve. Stir once more, then serve with crackers, toast points, veggies, or as a dip for toast.
Notes
Make-ahead: Mix it up and chill for at least 1 hour. Overnight is even better.
Store: Keep in an airtight container in the fridge. Stir before serving.
Leftovers: Spread it on toast for a quick lunch, tuck it into wraps, dollop onto baked potatoes, or stir a spoonful into warm pasta for a creamy, briny sauce moment.
- Prep Time: 10 minutes
- Cook Time: 0 minutes
- Category: Appetizer
- Method: No Cook
- Cuisine: Mediterranean
Nutrition
- Serving Size: 1/4 cup
- Calories: 150
- Sugar: 1
- Sodium: 400
- Fat: 15
- Saturated Fat: 6
- Unsaturated Fat: 8
- Trans Fat: 0
- Carbohydrates: 3
- Fiber: 1
- Protein: 3
- Cholesterol: 25