

Learn how to make Brazilian Cheese Bread (Pão de Queijo) with just 7 ingredients! Crispy outside, chewy inside, and naturally gluten-free — perfect for snacks or gatherings.
What Is Brazilian Cheese Bread?
Brazilian Cheese Bread — or as it’s called in Brazil, pão de queijo — is one of those magical recipes that feels like a warm hug from the inside out. Imagine biting into something that’s golden and crisp on the outside, then chewy, stretchy, and delightfully cheesy in the middle. That’s pão de queijo. It’s a beloved Brazilian snack that’s traditionally enjoyed at breakfast, served with coffee, or shared as an afternoon treat with friends and family.
I still remember the first time I tried Brazilian Cheese Bread. We were visiting family friends in New Jersey — he was from São Paulo, and she made a big batch of these little cheese rolls for our kids while the grownups chatted over coffee. They came out piping hot, and my daughter Emma took one bite, turned to me, and whispered, “Can we live here?” That’s the kind of reaction this snack gets.
The beauty of pão de queijo is that it’s naturally gluten-free, made with tapioca flour instead of wheat, which also gives it that signature chew. It’s been a staple in Brazilian households for centuries — comforting, budget-friendly, and always welcome at the table.
“Crispy on the outside, soft and stretchy on the inside — like a cheesy mochi met a biscuit and fell in love.”
Serve it up warm with your favorite dip or perfect alongside garlicky green beans for a satisfying snack board that hits every note.
Why You’ll Love This Recipe
There’s something about Brazilian Cheese Bread that brings people together — maybe it’s the aroma of cheese baking, or that first warm, stretchy bite. Around here, whenever I make a tray of pão de queijo, they barely make it off the baking sheet. Noah, my middle one, once stood at the oven door chanting “cheese balls, cheese balls” until I handed him the first one (still too hot, but he didn’t care).
These cheese rolls are easy enough for weeknight snacks but special enough to serve at parties. The dough comes together in minutes, and you don’t need a stand mixer or anything fancy. And since it’s naturally gluten-free, everyone at the table can enjoy them — no substitutions or special flours needed.
Here’s why you’ll keep coming back to this easy Brazilian recipe:
• Naturally gluten-free – made with tapioca flour, no wheat in sight
• Easy pantry ingredients – just seven basics, most of them fridge staples
• Crowd-pleasing – picky eaters, cheese lovers, and guests all agree: these are irresistible
• Make-ahead friendly – freeze the dough or baked rolls for snack emergencies
They’re just as addictive as another cheesy, snackable favorite on the blog. And once you make these, don’t be surprised if someone asks, “When are you making them again?”
Ingredients You’ll Need
One of my favorite things about Brazilian Cheese Bread is that you don’t need anything fancy to pull it off. Just seven ingredients — most of which you probably already have — come together to make the fluffiest, chewiest pão de queijo. It’s the kind of recipe that’s easy to keep on standby for last-minute guests or after-school snacks.
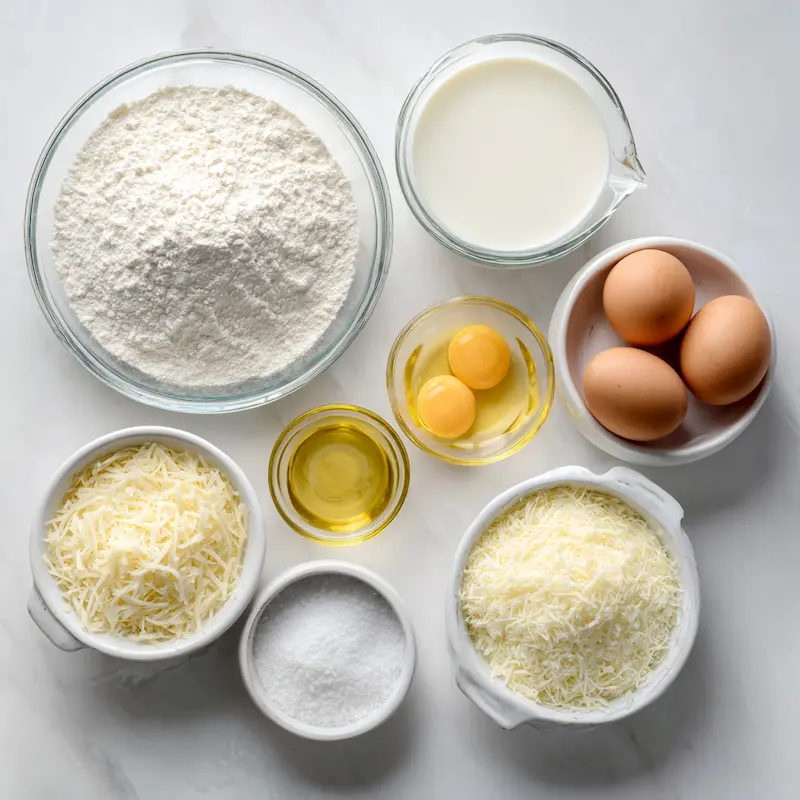
Here’s what you’ll need:
• 2 cups tapioca flour – This is the magic ingredient! It gives the bread its chewy texture and keeps it gluten-free. You can usually find it in the baking aisle or international section.
• 1 cup milk – Whole milk works best here, but 2% is fine too. (Eva’s tip: warming the milk helps avoid clumps — more on that in the steps!)
• ½ cup vegetable oil – For richness and that crispy outside. Neutral oils like canola work great.
• 2 large eggs – These help bind the dough and give it that beautiful puff.
• 1 cup grated Parmesan cheese – Sharp, salty, and classic.
• ½ cup grated Mozzarella cheese – This adds stretch and a softer bite.
• ½ teaspoon salt – Just enough to balance the cheese without overpowering.
If you’ve never worked with tapioca flour before, don’t worry — it’s very forgiving. The dough will feel a little different than wheat-based doughs, but once you see (and smell) these cheesy rolls puffing up in the oven, you’ll be hooked.
How to Make Brazilian Cheese Bread (Step-by-Step)
Once you try making Brazilian Cheese Bread at home, it might just become one of your go-to recipes. The process is simple, but there are a few little tips I’ve picked up over the years to make sure every batch of pão de queijo comes out perfectly chewy and golden.
Here’s how I do it — doughy hands and all.
1. Preheat your oven to 375°F (190°C)
Always start with a hot oven. These little rolls rely on that first blast of heat to puff up. If your oven runs cool, they may not rise properly — I learned this the hard way with a sad, flat batch on a rainy Tuesday.
2. Warm the milk and oil together
In a small saucepan, heat:
• 1 cup milk
• ½ cup vegetable oil
Just until steaming — don’t boil it. This helps the starch in the tapioca flour absorb better, and makes the dough smoother.
Eva’s Note: “I’ve found warming the milk slightly helps everything blend smoother — no clumps in the batter!”
3. Mix the warm liquid into the tapioca flour
In a large mixing bowl, add:
• 2 cups tapioca flour
Then slowly pour in the warm milk and oil mixture, stirring gently with a wooden spoon. It will look a bit lumpy and odd at first — almost like stretchy mashed potatoes. Totally normal!
4. Let the mixture cool slightly, then add the eggs
Once the bowl is cool enough to touch (we don’t want scrambled eggs!), stir in:
• 2 large eggs
Mix until incorporated. The dough will become sticky and more cohesive.
5. Fold in the cheeses and salt
Now for the good stuff! Add:
• 1 cup grated Parmesan cheese
• ½ cup grated Mozzarella cheese
• ½ teaspoon salt
Stir until everything is combined. You should have a thick, sticky dough that holds together but still feels a bit elastic.
Eva’s Note: “Don’t overmix. A gentle hand goes a long way — the dough should be sticky but not overworked.”
6. Scoop and shape the dough
You can use:
• A cookie scoop
• Lightly oiled hands
• A mini muffin tin (see tip below!)
Place golf ball–sized portions onto a parchment-lined baking sheet, about 2 inches apart.
Bonus Tip: “If shaping by hand feels messy, I bake them in mini muffin pans — they’re adorable!”
7. Bake for 18–22 minutes
Bake until the tops are puffed and lightly golden. The outside will be crisp, and the inside should be tender and chewy. Let them cool slightly before serving — if you can wait.
8. Serve warm and enjoy
Fresh out of the oven is best, but leftovers reheat beautifully.
Serving idea: If you’re making these for a party, serve it with this creamy bean dip for a savory pairing that guests will rave about.
Tips for Perfect Pão de Queijo
Even though Brazilian Cheese Bread is pretty forgiving, there are a few tricks to help you get that ideal puff and chewy center every time. Over the years (and through more than one “oops” batch), I’ve picked up some tried-and-true tips that’ll save you from frustration — and help your pão de queijo truly shine.
• Use warm milk and oil
This helps the tapioca flour absorb properly. Cold liquids can make the dough seize or clump.
• Mix gently
You want to combine everything well, but don’t beat it into submission. Overmixing can lead to dense rolls that don’t puff as much.
• Freshly grate your cheese
Pre-grated cheese often has anti-caking agents that keep it from melting smoothly.
Eva’s Note: “If I use pre-grated cheese in a pinch, the rolls don’t puff quite the same. Freshly grated works best.”
• Don’t skimp on the tapioca flour
It’s the key to the chewy, stretchy texture. Swapping it out will change the entire feel of the bread.
• Check your oven temp
A hot oven is essential. If your cheese bread isn’t puffing, your oven might not be fully preheated.
• Mini muffin tins work wonders
They help keep a uniform shape and make clean-up easier — especially if you’re short on time.
• Experiment with cheese blends
Parmesan + mozzarella is classic, but I’ve also used sharp cheddar or a little Monterey Jack when I’m low on supplies. Delicious every time.
Eva’s Note: “Once, I made a batch with only pre-shredded mozzarella, and they came out more like cheesy hockey pucks. Lesson learned: it’s worth those few extra minutes with the grater!”
Storage and Reheating
If your family is anything like mine, Brazilian Cheese Bread rarely lasts past the day it’s made. But on the off chance you have leftovers — or want to make a double batch — pão de queijo is very freezer-friendly and reheats beautifully. I’ve even been known to sneak a few into lunchboxes (they’re gone by noon).
Room Temp
If you plan to eat them within a day, keep the rolls in an airtight container at room temperature. They’ll stay soft and chewy for a few hours, but they’re best warm.
Fridge
Store leftover rolls in the fridge for up to 4 days. Just know the texture may firm up a bit — nothing a quick warm-up won’t fix.
Freezer
There are two great ways to freeze pão de queijo:
• Before baking: Shape the dough into balls, place them on a tray, and freeze until solid. Then transfer to a zip-top bag.
• After baking: Let the rolls cool completely, then freeze in a sealed container or bag.
Eva’s Note: “I often flash-freeze the shaped dough balls — then bake fresh for guests! It’s my secret weapon for last-minute gatherings.”
Reheating
To reheat, pop them in a 350°F oven for about 5–7 minutes. If frozen, bake straight from the freezer, adding just 3–5 extra minutes. The outside crisps up again, and the inside becomes perfectly soft and cheesy.
Kid Tip: My daughter Lily warms hers in the toaster oven after school — a fast, filling snack that feels like a treat.
Serving Suggestions
Brazilian Cheese Bread isn’t just a snack — it’s a vibe. Warm, comforting, and full of personality, pão de queijo fits in just about anywhere. Whether you’re planning a weekend brunch, prepping for a game day spread, or just need something cozy with your soup, these little cheese rolls always deliver.
Here are a few of my favorite ways to serve them:
• With breakfast or brunch – Serve warm alongside eggs, fresh fruit, or even avocado slices. They’re a fun twist on your usual toast.
• With soups and stews – That chewy, cheesy bite pairs perfectly with a bowl of something warm. My go-to? Tomato soup or a hearty lentil stew.
• As part of a party platter – Add them to a spread with olives, cut veggies, and dips like hummus or this creamy bean dip.
• After-school snack – Pop a few in the toaster oven, and you’ve got a snack your kids will actually eat.
• Holiday gatherings – Set out a tray of pão de queijo at Thanksgiving or Christmas — they disappear faster than the stuffing.
• With green veggies – Balance the richness by serving them perfect alongside garlicky green beans.
Eva’s Note: “One Sunday, I served these with a veggie salad, spiced nuts, and iced tea on the patio. My husband called it ‘the best lunch of the month’ — and I didn’t even have to cook meat!”
Frequently Asked Questions about Brazilian Cheese Bread
Q: Is Brazilian cheese bread gluten-free?
Yes, Brazilian cheese bread is naturally gluten-free because it’s made with tapioca flour, not wheat. That chewy texture? All thanks to tapioca starch.
Eva’s Note: “One of our close friends has celiac disease, and she was so touched when I brought a batch of these over — she hadn’t had ‘bread’ in months. She ate four on the spot!”
Q: What cheese is best for Brazilian cheese bread?
Parmesan is the classic choice for its sharp, salty flavor, but blending it with mozzarella gives a creamier bite and a stretchier center. Some folks even add a bit of cheddar or Monterey Jack for fun.
Eva’s Note: “I’ve found that ¾ Parmesan to ¼ mozzarella is my personal sweet spot — cheesy but not oily, with just the right pull.”
Q: Can I freeze Brazilian cheese bread dough?
Absolutely. Shape the dough into balls, freeze them on a tray until solid, then transfer to a zip-top bag. You can bake them straight from the freezer — just add 3–5 minutes to the baking time.
Eva’s Note: “I batch-freeze dough on Sunday nights so the kids can pop a few into the oven before school. Instant happiness.”
Q: Why didn’t my pão de queijo puff up?
A few things could be the culprit:
• Your oven might not have been fully preheated
• You may have overmixed the dough
• Cold milk or oil can keep the starch from working properly
Eva’s Note: “The first time I made them, I rushed and skipped the milk warming step. They came out like cheesy pancakes. Now I never skip it — the little things really do matter.”
Print
Brazilian Cheese Bread (Pão de Queijo)
- Total Time: 30 minutes
- Yield: 20 rolls 1x
Description
Crispy on the outside, chewy and cheesy on the inside, Brazilian Cheese Bread (Pão de Queijo) is a naturally gluten-free snack made with tapioca flour and simple ingredients.
Ingredients
2 cups tapioca flour
1 cup milk
½ cup vegetable oil
2 large eggs
1 cup grated Parmesan cheese
½ cup grated Mozzarella cheese
½ teaspoon salt
Instructions
1. Preheat oven to 375°F (190°C) and line a baking sheet with parchment paper.
2. Warm the milk and vegetable oil in a small saucepan until steaming, not boiling.
3. Place tapioca flour in a large mixing bowl and slowly stir in the warm milk and oil mixture.
4. Let the mixture cool slightly, then add the eggs one at a time, mixing until smooth.
5. Fold in the Parmesan, Mozzarella, and salt until the dough is thick and sticky.
6. Scoop dough into tablespoon-sized portions and place them on the prepared baking sheet or into mini muffin tins.
7. Bake for 18–22 minutes until puffed and golden brown.
8. Let cool slightly and serve warm.
Notes
Warm the milk before mixing to help create a smoother dough.
Use freshly grated cheese for best puff and texture.
Dough balls can be frozen before baking for easy future snacking.
If the dough feels too sticky, lightly oil your hands to help with shaping.
- Prep Time: 10 minutes
- Cook Time: 20 minutes
- Category: Snack
- Method: Baking
- Cuisine: Brazilian
Nutrition
- Serving Size: 1 roll
- Calories: 90
- Sugar: 0g
- Sodium: 180mg
- Fat: 5g
- Saturated Fat: 2g
- Unsaturated Fat: 2g
- Trans Fat: 0g
- Carbohydrates: 9g
- Fiber: 0g
- Protein: 3g
- Cholesterol: 20mg