There are nights when everyone is hungry, the day has been long, and you still want that cozy “pizza night” feeling without ordering out. This Chicken Crust Pizza is what I make when I’m craving something cheesy and comforting, but I also want a high protein dinner that actually keeps me full.
It started as our family’s “protein-first” pizza night, and now it’s in regular rotation because it checks so many boxes. When the garlic powder and Italian seasoning hit the oven heat, my kitchen smells like dinner is already handled, which is honestly the kind of calm I need on a weeknight. Plus, it’s a gluten free pizza crust, so it works for a lot of households without extra fuss.
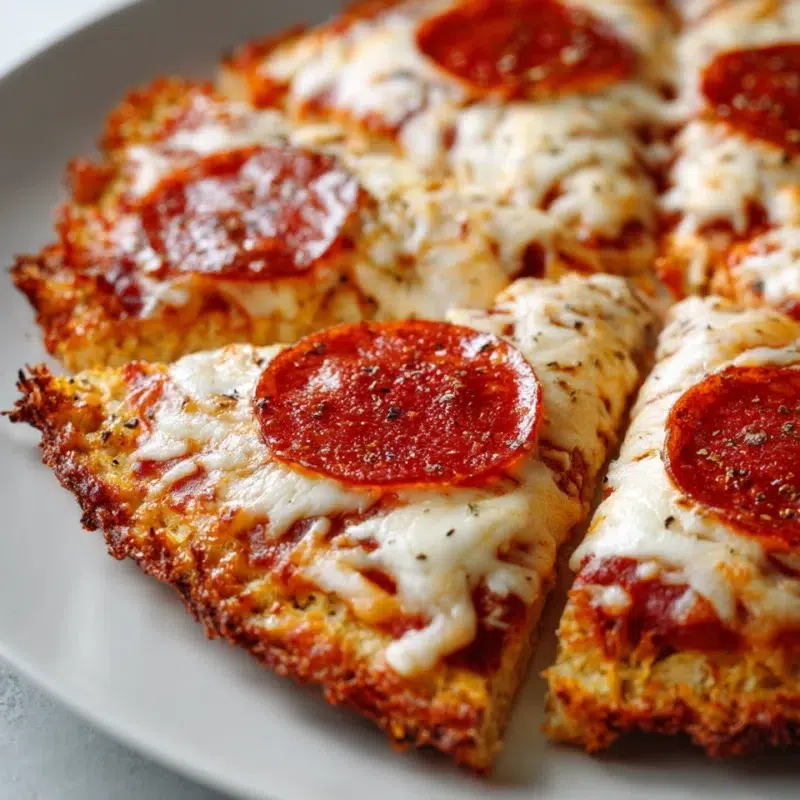
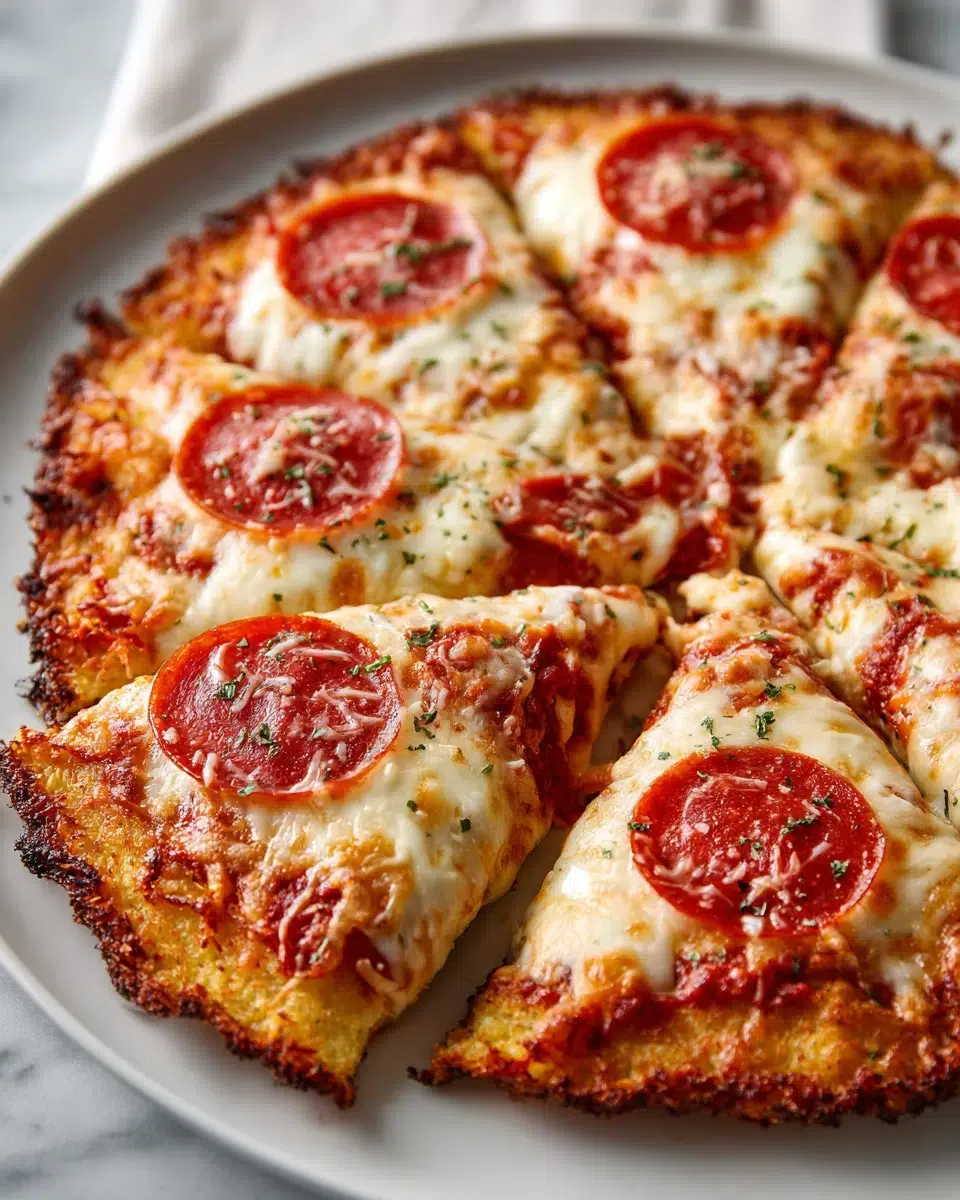
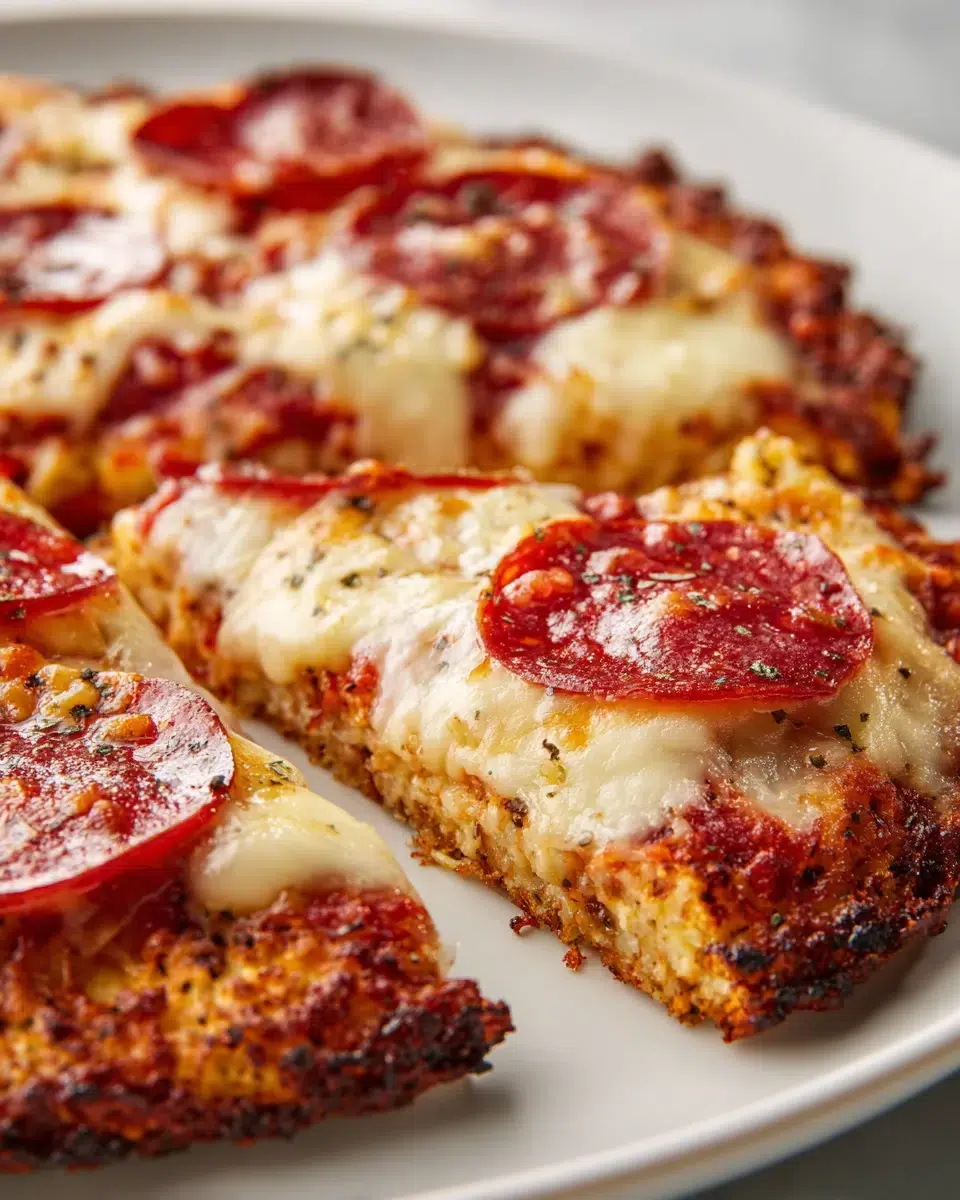
- What to expect: Crisp edges with a savory, cheesy bite
- What to expect: A tender center that still slices cleanly
- What to expect: Best results with lighter sauce and lower-moisture toppings
Why This Chicken Pizza Crust Works (And What the Texture Is Like)
This chicken pizza crust works because it’s built like a smart little system. The eggs bind everything, the parmesan adds salty flavor and helps it set, and the seasonings make it taste like “real pizza” even though there’s no flour involved. It’s one of those low carb meals easy enough for a Tuesday, but satisfying enough that nobody feels like they’re eating “diet food.”
I still remember the first time I flipped the crust without it cracking. I had that proud mom moment where I wanted to call everyone into the kitchen like, “Look, it’s holding together.” Noah, my honest taste tester, took one bite and said, “Okay, this is actually good.” That is basically a five-star review in my house.
Set your expectations: This low carb pizza crust is not bready like a traditional dough. Think more like a savory, cheesy flatbread with crisp edges and a sturdy, protein-packed bite. It’s exactly what you want for a high protein low carb dinner when you still want pizza night vibes.
Ingredients You’ll Need
This is one of my favorite easy high protein meal lineups because most of it is fridge and pantry basics. The parmesan is the little shortcut that makes it taste like you did more work than you did, which is my favorite kind of cooking.
- 450 g ground chicken (the crust base)
- 2 large eggs (binder)
- ½ cup grated parmesan cheese (flavor + helps set)
- 1 tsp garlic powder (quick savory boost)
- 1 tsp Italian seasoning (pizza flavor)
- ½ tsp salt (brings it alive)
- ½ tsp black pepper (warm bite)
- ½ cup pizza sauce (go light)
- 1 cup shredded mozzarella cheese (melty top)
- 20 turkey pepperoni slices (classic topping)
Optional variations (toppings): ½ cup sliced mushrooms (pre-cooked), ½ cup diced bell peppers (pre-cooked or patted dry), ¼ cup sliced olives, ½ tsp crushed red pepper flakes.
How to Make Chicken Crust Pizza (Step-by-Step)
This is where the magic happens. My weeknight workflow is simple: while the crust pre-bakes, I shred cheese, set out sauce, and let the kids “argue politely” about toppings. If you love High Protein Recipes Dinner ideas that feel fun and not fussy, this one’s for you. It’s also great for meal prep high protein dinner plans because you can pre-bake the crust and finish it later.
If you want another pizza-style option that’s just as weeknight-friendly, I also make this high-protein pizza bowl for busy nights when I need something even faster.
Step 1 — Mix the crust
- Heat your oven to 400°F. Line a large sheet pan with parchment paper.
- In a large bowl, combine the ground chicken, eggs, parmesan, garlic powder, Italian seasoning, salt, and black pepper.
- Mix just until everything is evenly combined. You want it cohesive and thick, not overworked.
- Signs it’s right: It looks like a thick, seasoned mixture you can spread.
- Signs it’s right: When you scoop it, it holds together instead of running.
If your mixture seems too wet, don’t panic. You can thicken it, and I’ll walk you through the best fixes in the FAQ and troubleshooting sections. Micro-tip: Mix gently and stop once it’s uniform.
Step 2 — Shape + pre-bake for structure
- Scoop the mixture onto the parchment-lined pan.
- Press it into a round or rectangle about ¼-inch thick. Make the edges slightly thicker like a little pizza rim.
- Press it evenly for a sturdy slice. If one spot is thinner, that’s where it’ll want to bend. An even press means confident flipping and neat slices.
- Pre-bake for 20 to 25 minutes, until the top looks set and the edges start to deepen in color.
Crisp edges start with an even press.
This pre-bake chicken pizza crust step is the difference between “kind of works” and “I can actually pick up a slice.” Micro-tip: Watch the edges, they tell you what’s happening before the center does.
Step 3 — Flip for a crispier finish
This is the step that takes it from good to “why is this so crispy?” and it’s especially important for chicken crust pizza.
- Loosen: Use a spatula to loosen the crust from the parchment.
- Lift: Slide the spatula under and lift gently (you can use a second spatula if it’s large).
- Flip: Flip it over so the underside can dry out and brown.
Bake for 8 to 10 minutes more. Micro-tip: If you’re nervous, flip it in two halves. I’ve done that on tired nights and it still works.
Step 4 — Top + bake again
- Spread a light layer of pizza sauce over the crust.
- Add mozzarella cheese.
- Top with turkey pepperoni and any optional toppings you like (just keep them on the drier side).
- Bake for 8 to 10 minutes, until the cheese is melted and bubbling.
Topping order: sauce → cheese → toppings.
This is where people can accidentally make it soggy, but don’t worry, I’ve got you. For this crust, my rule is “less sauce, more cheese.” Rest before slicing: Let it sit 5 minutes before cutting so steam can settle and the slices stay sturdy.
Best Pan + Lining Choices for a Crisp Crust
I learned the sticking lesson the hard way. The first time I tried a chicken crust, I used the wrong lining and ended up scraping little pieces off the pan like it was a science experiment. Now I stick to a simple setup that gives me a crispy low carb pizza crust without the drama.
- Parchment paper — Best for: Easy release and reliable flipping
- Foil (well-greased) — Best for: When you’re out of parchment, but it can stick if you’re not generous with oil
- Dark metal sheet pan — Best for: More browning and crisp edges
- Rimmed sheet pan — Best for: Catching any juices so your oven stays clean
If you love reading about pizza technique and pan styles, this is great pizza night inspiration and pan tips for when you’re in the mood for a more classic bake.
Toppings + Variations (Classic to Veggie-Loaded)
This is where you can make it feel like your family’s pizza night, not just a recipe. We do “build-your-own” sometimes, and it’s honestly the easiest way to get everyone fed without a negotiation. Lily likes hers simple and cheesy, Noah goes heavy on savory toppings, and Emma wants olives one day and “no green things” the next. Parenting is a ride.
The crust itself is already a solid base for healthy high protein meals, so toppings are about flavor and keeping moisture under control. Since it’s a gluten free pizza crust, it’s also a nice option for sharing with friends who avoid gluten.
- Classic Pepperoni (turkey pepperoni + extra mozzarella)
- Veggie Crunch (pre-cooked mushrooms, patted-dry peppers, olives)
- Spicy & Cheesy (crushed red pepper flakes + extra parmesan on top)
- Italian Herb Lover (extra Italian seasoning, black pepper, and a little more sauce, but still light)
If you want another fun option that’s still in the “Healthy Food Dishes” lane, try another cheesy, protein-packed pizza-inspired bake for a spoonable, casserole-style dinner.
How to Prevent a Soggy Chicken Crust
If you’ve ever tried a chicken crust and ended up with a soft bottom, you are not alone. This is the part that makes it feel like a reliable recipe instead of a gamble. The goal is to drive off moisture and avoid steaming the crust once toppings go on. That’s what keeps this in the “low carb meals easy” category instead of “why is this falling apart?”
- Do this first: Pre-bake until set and the edges deepen in color
- Flip the crust and bake again to dry the underside
- Use less sauce, better texture, just enough for flavor
- Pre-cook watery toppings (like mushrooms) or pat them dry
- Keep cheese as your main “moisture buffer” under toppings
- Rest 5 to 10 minutes before slicing (my two-minute patience rule grew into five)
That rest time matters more than it seems. When I cut into the first slice and hear that little crisp sound at the edge, I know it’s going to be a good dinner.
Make-Ahead + Meal Prep Plan
Future-you deserves a break. When I’m doing Sunday prep, I’ll sometimes pre-bake one or two crusts and stash them in the fridge. Opening the refrigerator on a busy night and seeing “pizza night” basically ready to go feels like a tiny miracle. This is one of my favorite meal prep high protein dinner tricks because it’s flexible and family-friendly.
- Fridge: Pre-bake the crust, cool completely, then wrap tightly and refrigerate. Add sauce and toppings when you’re ready, then bake until hot and bubbly.
- Freezer: You can freeze a pre-baked crust or fully baked slices. Wrap well so it doesn’t pick up freezer flavors.
- Reheating: Use an oven or toaster oven to bring back crispness. (More on that in the FAQ.)
If you’re building a rotation of easy high protein meal ideas, keep this one in your back pocket alongside that high-protein pizza bowl for busy nights for the weeks when everyone’s schedule is all over the place.
Troubleshooting (Quick Fixes)
If something goes sideways, it’s fixable. I’ve made this on days when I was distracted, helping with homework, and trying to answer a text with floury hands. Here’s how to get back on track calmly.
- Problem: Crust sticks
Cause: Wrong lining or not enough grease
Fix: Use parchment paper every time, and let it bake until it releases easily - Problem: Crust cracks when flipping
Cause: Too thin or not baked enough
Fix: Press evenly, keep it about ¼-inch thick, and bake a few more minutes before flipping - Problem: Center feels soft
Cause: Moisture needs more time to cook off
Fix: Extend the flip-bake by 3 to 5 minutes, then top and bake again - Problem: Flavor feels bland
Cause: Needs more seasoning or salt
Fix: Add a pinch more salt, garlic powder, or Italian seasoning next time, and finish with a sprinkle of parmesan - Problem: Mixture feels too wet
Cause: Extra liquid in the chicken
Fix: Blot gently, add a bit more grated cheese to thicken mixture, and let it sit a few minutes before pressing
When in doubt, give it a few extra minutes in the oven. With this crust, a little more time usually equals more crispy and more confidence.
Frequently Asked Questions about Chicken Crust Pizza
Q: How do you keep chicken crust pizza from getting soggy?
✅ Answer: Pre-bake the crust until it looks set and the edges start to deepen in color, then flip and bake again to drive off moisture. Use a light layer of sauce, and pre-cook or pat dry any watery toppings (like mushrooms or peppers). After the final bake, rest the pizza 5–10 minutes so steam doesn’t soften the bottom as you slice.
💡 Personal Detail: I love that little sound of a crisp edge when I cut the first slice.
Q: Do you need to pre-bake a chicken pizza crust before adding toppings?
✅ Answer: Yes—pre-baking is what gives the crust structure so it can hold sauce and toppings. Without that first bake, the crust tends to stay soft and can release moisture into the pan. Pre-bake until it’s firm enough to lift and flip, then add toppings and bake again to melt and brown.
💡 Personal Detail: I always peek at the edges first, they tell me more than the center does.
Q: What can I use instead of parmesan in chicken crust pizza?
✅ Answer: You can use finely grated hard cheeses that melt and bind well, such as pecorino, asiago, or a parmesan-style blend. For a milder flavor, try grated mozzarella mixed with a little extra seasoning; the crust may be slightly softer, so focus on a thorough pre-bake and a flip for best texture.
💡 Personal Detail: When I want a gentler flavor for the kids, we go with a milder blend and I bump up the seasoning.
Q: Can I make chicken crust pizza ahead of time and store it?
✅ Answer: Yes. Pre-bake the crust, cool it completely, then store it tightly wrapped in the refrigerator. When you’re ready to eat, add sauce and toppings and bake until hot and bubbly. You can also fully bake the pizza and refrigerate slices for quick lunches—reheat using a method that restores crispness.
💡 Personal Detail: I’ve packed a slice for next-day lunch more times than I can count, it’s such an easy win.
Q: How do you reheat chicken crust pizza so it stays crispy?
✅ Answer: Reheat in a hot oven or toaster oven on a sheet pan until the cheese is bubbling and the bottom feels firm again. For extra crispness, place the slice directly on the rack for the last couple minutes. Avoid covering it tightly while reheating, since trapped steam softens the crust.
💡 Personal Detail: Two extra minutes is what takes it from “fine” to “perfect” in my toaster oven.
Q: What’s the best way to thicken chicken crust pizza mixture if it feels too wet?
✅ Answer: First, make sure your ground chicken isn’t releasing extra liquid; if it is, gently blot with paper towels. Next, add a little more grated cheese to help bind, and mix just until combined. Let the mixture sit for 3–5 minutes—often it firms up as the cheese hydrates.
💡 Personal Detail: You can literally watch it go from “slippery” to “spreadable” after a short rest.
Q: Can you freeze chicken crust pizza (whole or slices)?
✅ Answer: Yes. Freeze fully cooled slices on a tray until firm, then wrap tightly and store in a freezer bag. For a whole pizza, freeze it on the pan first, then wrap well. Reheat from frozen in the oven until hot and the edges crisp up again.
💡 Personal Detail: I label freezer packs for those “Abendessen Ideen Schnell” nights when I need dinner without thinking.
Q: Can I cook chicken crust pizza in a slow cooker, and how long would it take compared to the oven?
✅ Answer: A slow cooker can cook the mixture through, but it won’t crisp the crust the way an oven does. Expect it to take longer than baking—plan on a few hours on a standard setting, and the texture will be softer. If you try it, finishing in a hot oven (or under a broiler) is the best way to add browning and firmness.
💡 Personal Detail: I’ve had those cozy set-it-and-forget-it days, and finishing in the oven is what makes it feel like real pizza.
Q: How do you know when the chicken pizza crust is fully cooked?
✅ Answer: The crust should look set and opaque throughout, feel firm when you press the center, and release from the parchment easily. The edges will be deeper in color, and after flipping, the underside should look dry and lightly browned. If you’re unsure, cook a few minutes longer before adding toppings.
💡 Personal Detail: I do a quick center press test, it should feel firm and springy, not squishy.
This Chicken Crust Pizza has become one of those reliable, comforting dinners I can make even when life is loud. It’s a high protein dinner that still feels like pizza night, and once you get the flip-and-crisp method down, it’s honestly hard not to make it again. If you’re collecting Receitas Fitness or Low Carb Rezepte that actually taste like something you’d want to eat twice, put this one on your list.
Thank you for cooking with me, I’m so happy you’re here in my little New York kitchen.
Come hang out with me over on Pinterest for more cozy, family-friendly recipes.
Print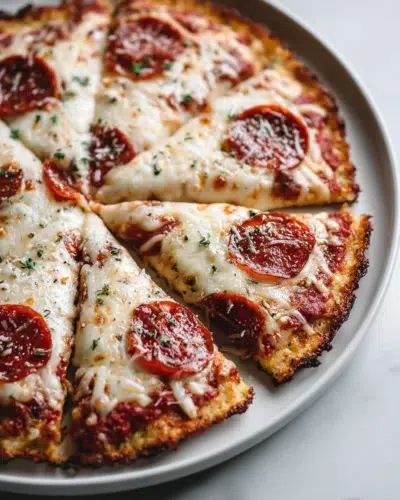
Chicken Crust Pizza (High Protein, Low Carb)
- Total Time: 45 minutes
- Yield: 4 servings 1x
Description
Chicken Crust Pizza is a high protein, low carb dinner idea made with ground chicken, eggs, and parmesan, crispy, cheesy, and easy to customize.
Ingredients
450 g ground chicken
2 large eggs
½ cup grated parmesan cheese
1 tsp garlic powder
1 tsp Italian seasoning
½ tsp salt
½ tsp black pepper
½ cup pizza sauce
1 cup shredded mozzarella cheese
20 turkey pepperoni slices
Instructions
1. Heat your oven to 400°F. Line a large sheet pan with parchment paper.
2. In a large bowl, combine the ground chicken, eggs, parmesan, garlic powder, Italian seasoning, salt, and black pepper. Mix just until everything is evenly combined.
3. Scoop the mixture onto the parchment-lined pan. Press it into a round or rectangle about ¼-inch thick. Make the edges slightly thicker.
4. Pre-bake for 20 to 25 minutes, until the top looks set and the edges start to deepen in color.
5. Use a spatula to loosen the crust from the parchment. Flip it over so the underside can dry out and brown. Bake for 8 to 10 minutes more.
6. Spread a light layer of pizza sauce over the crust. Add mozzarella cheese. Top with turkey pepperoni and any optional toppings you like.
7. Bake for 8 to 10 minutes, until the cheese is melted and bubbling. Let it sit 5 minutes before cutting.
Notes
Use parchment paper for easy release and reliable flipping.
Pre-bake until set and the edges deepen in color to prevent sogginess.
Rest 5 to 10 minutes before slicing to keep slices sturdy.
- Prep Time: 10 minutes
- Cook Time: 35 minutes
- Category: Dinner
- Method: Baked
- Cuisine: American
Nutrition
- Serving Size: 1 slice
- Calories: 320
- Sugar: 2
- Sodium: 720
- Fat: 18
- Saturated Fat: 8
- Unsaturated Fat: 8
- Trans Fat: 0
- Carbohydrates: 4
- Fiber: 1
- Protein: 36
- Cholesterol: 140