How to bake an epic sponge buttercream ganache cake—airy vanilla sponge, silky Swiss buttercream, and glossy chocolate drip. Full recipe, no-slide tips & FAQs.
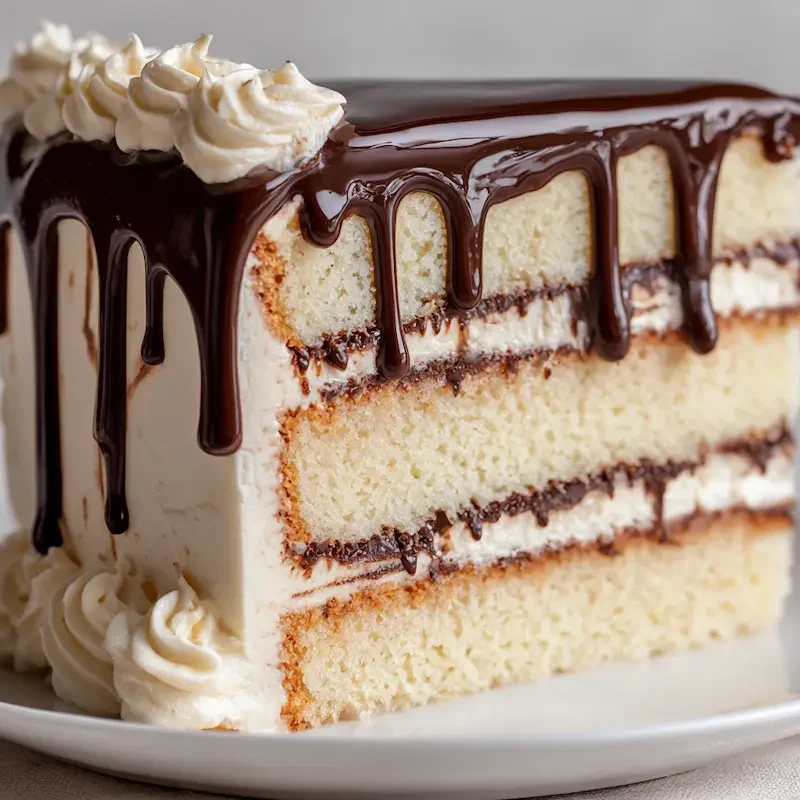
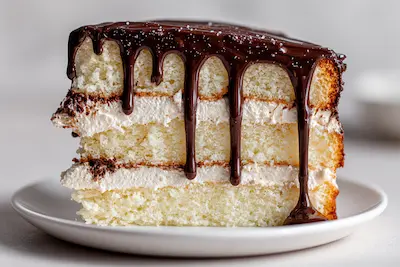
You know those cakes that stop the room for a second? That’s what this sponge buttercream ganache cake does. With its tall, fluffy layers, swirls of creamy frosting, and a glossy chocolate drip that catches the light just right—it’s pure celebration. And the best part? It’s absolutely doable in a home kitchen.
The kids call this my “celebration tower.” I first made it for my daughter Lily’s birthday when she turned eleven. She wanted something “chocolatey but still vanilla-ish” (her words), and I wanted something sturdy enough to layer tall and proud without sliding into a frosted disaster. This cake delivered both—and now it’s a family favorite.
Prep Time: 1 hr
Bake Time: 25 min
Chill + Decorate: 2 hrs
Total Time: About 4 hrs (with cooling)
Yields: One tall 8-inch cake (12–14 slices)
Why You’ll Love This Sponge Buttercream Ganache Cake
There’s something extra special about a cake that brings drama and comfort in the same bite. This one does just that.
Here’s why it works (and why it’ll earn a spot in your repeat dessert rotation):
• Fluffy yet sturdy sponge: The reverse-creamed vanilla sponge holds up beautifully to stacking—no collapsing here.
• Silky Swiss buttercream: Not too sweet, and stable enough for tall cakes.
• Glossy chocolate ganache drip: Striking, smooth, and rich without overpowering the sponge.
• Make-ahead friendly: Bake and chill the layers in advance, then assemble when you’re ready.
• Flavor-flexible: Start with vanilla sponge chocolate ganache—but feel free to go mocha, raspberry, or caramel with ease.
Eva’s Note: I actually tested this side-by-side with my “Boston Cream Pie cupcakes” recipe, and the combo of whipped egg sponge and chocolate drizzle brought back all the birthday feels. Just way more grown-up.
Ingredient Snapshot
This sponge buttercream ganache cake uses classic ingredients you probably already have in your pantry. But each one plays a big role in getting those tall, clean slices and that swoon-worthy texture.

Here’s a quick glance:
Tall Vanilla Sponge (3 × 8-inch layers)
• 8 large eggs, room temp — gives the sponge its rise and airy texture
• 1 ¾ cups granulated sugar — sweetens and stabilizes the whipped eggs
• 2 cups cake (or AP) flour, sifted — cake flour makes it extra tender
• 2 ½ tsp baking powder — the backup leavening for tall height
• ½ tsp fine salt — boosts flavor
• 6 Tbsp unsalted butter, melted & cooled — adds richness
• 2 Tbsp warm whole milk — keeps the sponge moist
• 2 tsp pure vanilla extract — flavor base for the vanilla sponge chocolate ganache combo
Eva’s Note: I’ve also swapped ¼ cup of the flour for cocoa powder when I want a chocolate sponge with ganache—it adds depth without drying things out.
Swiss Meringue Buttercream
• 6 egg whites (≈ 180 g) — the base of the meringue
• 1 ⅔ cups granulated sugar — dissolved into the whites for a stable whip
• 1 ½ cups unsalted butter, cubed, 65–70 °F — soft but not greasy
• 1 tsp vanilla extract — smooth flavor lift
• Pinch fine salt — balances sweetness
Optional flavor twists: espresso paste or freeze-dried strawberry powder are magic here.
Chocolate Ganache
• Drip glaze: 12 oz bittersweet chocolate (60–70%) + 12 fl oz heavy cream — 1:1 for silky flow
• Thicker filling (optional): 4 oz chocolate + 2 fl oz cream — 2:1 ratio for spreadable richness
Eva’s Pantry Swap Tip: If you’re out of heavy cream, full-fat coconut cream works in a pinch. Just don’t tell Noah—he claims he can always taste the difference.
If you’re curious about swaps using nut flours or dairy-free options, check out my blueberry almond butter cake for some creative inspiration.
Choosing the Right Chocolate for Ganache
When it comes to ganache, the chocolate you pick makes all the difference—especially for that dreamy, glossy drip.

Here’s the lowdown:
| Chocolate Type | % Cacao | Best For | Drip Texture |
|---|---|---|---|
| Milk Chocolate | 30–40% | Sweet cakes, kids’ parties | Too soft, not ideal for drip |
| Semi-Sweet or Bittersweet | 60–70% | This recipe! | Just right—rich, glossy drip |
| Dark Chocolate (70–85%) | 70–85% | Intense flavor, less sweet | Firmer, may need more cream |
Eva’s Note: The first time Emma saw the ganache drip over the edge of the cake, she gasped and said, “It’s like a chocolate waterfall!” And honestly, that’s exactly the vibe.
I usually go with a 60–65% bittersweet bar—something I’d snack on straight. If the chocolate tastes great on its own, it’ll taste amazing in ganache.
Tip: For a softer, more “lava flow” finish, aim to pour your drip when it cools to about 85 °F. At that temp, the ganache clings like a cozy blanket but still flows—think maple syrup on Sunday pancakes.
The Sponge Base: Vanilla or Chocolate?
This cake starts with a sponge that’s tall, light, and flexible enough to hold up to generous fillings of buttercream and ganache. You can stick with classic vanilla or swap in cocoa for a deeper chocolate vibe. Either way, structure is key.
Here’s the science-y side, broken down simply:
- Whip the eggs properly. This sponge relies on whipped eggs (not oil or buttermilk) for rise. Warm them slightly before whipping—Grandma always said to give them a “sunny bath.” I just set mine in warm water for 5 minutes.
- Use the reverse-creaming method. Coat your flour in butter before adding eggs. It feels backward, but it keeps gluten from overdeveloping, giving you a soft, cloud-like crumb.
- Measure by weight when you can. Especially flour. A little extra can flatten your cake in a heartbeat.
- Don’t skip sifting. Sifted flour and leaveners help this batter stay light and airy.
Eva’s Note: I’ve made this as both a vanilla sponge chocolate ganache combo and a full cocoa sponge version (just sub ¼ cup flour for unsweetened cocoa). Both are winners. Noah prefers the chocolate one, but Emma is team vanilla all the way.
Step-by-Step: Baking the Perfect Sponge
This sponge isn’t tricky, but it is a little particular. The steps matter. Follow them closely and you’ll get tall, airy layers that hold their shape beautifully between all that buttercream and ganache.
What You’ll Need:
• 3 × 8-inch cake pans, greased + lined with parchment
• Stand mixer or hand mixer with whisk and paddle attachments
• Fine mesh sifter or sieve
1. Warm the Eggs
Fill a bowl with warm tap water and gently place your whole eggs in it for 5–10 minutes. Warm eggs whip higher and faster.
Tip: If your eggs are already room temp, skip this step—but cold eggs straight from the fridge will flatten your rise.
2. Whip Eggs + Sugar
In a stand mixer fitted with a whisk, beat 8 large eggs and 1 ¾ cups sugar on high for 6–8 minutes, until thick, pale, and tripled in volume. You want ribbons that sit on top of the mixture when the beater is lifted.
3. Sift + Combine Dry Ingredients
In a separate bowl, sift together:
• 2 cups cake flour
• 2 ½ tsp baking powder
• ½ tsp fine salt
Set aside.
4. Melt + Cool Butter
Gently melt 6 Tbsp butter. Stir in 2 Tbsp warm milk and 2 tsp vanilla. Let cool to lukewarm but not solidify.
Eva’s Note: Here’s the part Mom taught me—reverse-creaming!
Switch to the paddle attachment and mix your dry ingredients with the melted butter first until crumbly. It might look wrong, but it’s so right. Then, gently fold in the whipped eggs in three additions. The batter will seem loose, almost too airy—that’s your cloud texture in the making.
5. Bake
Divide the batter evenly into your prepared pans. Tap gently on the counter to pop air bubbles.
Bake at 350 °F (175 °C) for 22–25 minutes or until golden and springy. A toothpick should come out clean.
Cool 10 minutes in pans, then flip onto racks and cool completely.
Once cooled, these layers can be wrapped in plastic and stored at room temp overnight—or frozen for up to a month.
And yes, this method also works for my cloud cake made in a blender—it’s like this, but even easier when you’re short on time.
Swiss-Style Buttercream, Light but Stable
Swiss meringue buttercream is one of those frostings that feels fancy, but once you try it, you never go back. It’s smooth, glossy, not too sweet, and pipes like a dream. And best of all—it holds up beautifully with sponge and ganache layers.

Here’s how to make it work, even without a candy thermometer.
Ingredients Recap:
• 6 egg whites (≈ 180 g)
• 1 ⅔ cups granulated sugar
• 1 ½ cups unsalted butter, cubed, at 65–70 °F
• 1 tsp vanilla extract
• Pinch of salt
Step-by-Step:
- Combine whites and sugar.
In a large heatproof bowl (or the bowl of your stand mixer), whisk egg whites and sugar together. - Heat gently over simmering water.
Place the bowl over a pot of barely simmering water. Whisk constantly until the mixture feels smooth between your fingers—about 160 °F if you’re measuring.
Eva’s Note: No thermometer? No problem. The trick I use: when the bowl feels like a warm cocoa mug and the mixture no longer feels grainy, it’s ready.
- Whip to stiff peaks.
Transfer the bowl to your mixer and whip on high until stiff peaks form and the bowl is no longer warm—about 10 minutes. - Add butter slowly.
Switch to the paddle attachment. Add butter one cube at a time. Don’t panic if it curdles—it usually smooths out after a few more minutes of mixing. - Add vanilla and salt.
Finish with vanilla extract and a pinch of salt.
Common Fixes:
• Too soupy? Chill 10 minutes, then rewhip.
• Too curdled? Keep mixing. It often fixes itself.
• Grainy? The sugar wasn’t fully dissolved—next time, heat longer.
Once smooth, it’s ready to spread or pipe. This batch will frost and fill a tall three-layer cake generously, with enough leftover for swirls or piped borders.
Can I Blend Ganache Into Buttercream?
Oh yes, you absolutely can mix ganache and buttercream. In fact, it might be my son Noah’s favorite frosting of all time. He calls it “truffle frosting”—which, honestly, nails it.
The Magic Ratio:
2 parts ganache : 3 parts buttercream
This gives you a rich, spreadable frosting that’s still stable enough to stack. The cocoa butter in the ganache helps firm things up without losing that silky, buttery feel.
How to Do It:
- Let your ganache cool to room temp (≈ 75 °F). If it’s too warm, it’ll melt your buttercream.
- Gently fold 2 parts ganache into 3 parts Swiss buttercream until fully combined.
- Taste and swoon.
Eva’s Note: The first time Noah tasted this, he paused mid-bite and said, “Mom. This tastes like a chocolate truffle and a cloud.” I mean, what better endorsement could there be?
Want something darker? Go 1:1 for a richer, thicker spread—great for filling between layers of your sponge buttercream ganache cake when you want to really lean into the chocolate.
Silky Chocolate Ganache (Pour + Drip)
The ganache drip is the showstopper on this sponge buttercream ganache cake. Smooth, glossy, and just dramatic enough to make people think you hired a pro (when really, it was just you, a spoon, and a steady hand).

Ganache is just two ingredients: chopped chocolate and hot cream. But how you combine and cool them makes all the difference.
Basic Ganache Ratios
| Use | Chocolate | Cream | Ratio | Result |
|---|---|---|---|---|
| Drip glaze | 12 oz | 12 fl oz | 1:1 | Pours smoothly, sets glossy |
| Filling (thick) | 4 oz | 2 fl oz | 2:1 | Rich, spreadable, firm base |
Chop your chocolate finely, heat cream until it’s just simmering (not boiling), and pour over the chocolate. Let it sit a minute, then stir slowly from the center out.
Eva’s Note: Grandma always said, “Shiny ganache whispers, never shouts—stir slow!” I still hear her voice every time I reach for the whisk.
The 85 °F Drip Sweet Spot
Here’s your golden number: 85 °F. That’s when ganache clings like a cozy blanket but still flows. It should feel warm—not hot—like maple syrup on Sunday pancakes.
How to Drip:
- Chill your frosted cake for at least 20 minutes first.
- Spoon or pipe the ganache gently along the top edge.
- Let it cascade—don’t force it.
Tip: If the ganache runs too far, it’s too warm. If it globs or sticks, it’s too cool. Rewarm in 5-second microwave bursts or stir over a warm bowl.
Secrets for Zero-Slide Assembly
If you’ve ever watched your beautiful cake layers slowly shift to the side like a frosted Leaning Tower of Pisa… you’re not alone. But don’t worry—these tricks will keep your sponge buttercream ganache cake stacked like a dream.
Eva’s No-Slide Checklist:
Chill your layers. After baking and cooling, wrap and chill for at least 1 hour. Cold cake = clean cuts and less crumbling.
Use a dam ring. Pipe a ring of buttercream around the edge of each layer before adding filling. It keeps ganache or soft fillings from sneaking out the sides.
Dowels or straws for tall cakes. A simple dowel in the center or 3 bubble tea straws gives extra support without fuss.
Crumb-coat chill zone. After your first thin layer of buttercream (aka the crumb coat), chill the whole cake for 20 minutes. This seals crumbs and firms everything up.
Eva’s Note: I learned the hard way at a summer picnic when my lovingly made cake layers started to slide… and slide… until it looked like a frosting Ferris wheel. Now, I always let the cake “nap” in the fridge before the final coat. It’s like a reset button for cake stability.
Stacking & Leveling: The 4-Layer Method
Building a tall sponge buttercream ganache cake might sound like bakery-level magic, but with the right approach, it’s totally doable at home. Think of it like playing with grown-up Legos—just squishier, sweeter, and a lot more rewarding.
Here’s how I stack it tall without wobble:
- Level your layers.
Use a serrated knife or cake leveler to trim any domed tops. Flat layers stack best—save the scraps for snacking (or Emma’s favorite, “cake croutons”). - Choose your order.
Start with the sturdiest sponge layer on the bottom. If one feels thicker or more even, that’s your base. - Dam + fill.
Pipe a buttercream ring around the edge, then spoon in ganache or mixed ganache-buttercream filling. Gently spread to the ring—don’t overfill. - Repeat + stack.
Layer by layer, repeat the dam and fill, keeping each layer aligned. Give the cake a gentle press to settle it. - Insert a center dowel.
Use a trimmed wooden skewer or straw down the middle to hold everything steady, especially if transporting. - Crumb coat + chill.
Do a thin outer coat of buttercream, then chill 20 minutes. You’re now ready for the final finish and drip!
Eva’s Note: When Noah was little, we built cakes like he built his Lego towers—layer by layer, carefully lined up, with whispered “don’t fall!” moments. I still think of that every time I stack a celebration cake.
Decoration Ideas & Flavor Twists
Once your sponge buttercream ganache cake is stacked and chilled, it becomes a blank canvas. You can keep it classic with a smooth finish and drip, or go bold with flavors, textures, and decorations that reflect your mood—or your kids’ latest obsession.

Simple Decoration Ideas:
• Ganache drip + buttercream swirls – A timeless combo
• Fresh berries or chocolate curls – Adds color and texture
• Gold leaf or edible glitter – For a special occasion shimmer
• Piped rosettes or ombré sides – Great for birthdays or showers
• Textured combed sides – Use a cake scraper or fork for a rustic finish
Eva’s Note: For Lily’s 13th, we followed a “pick-your-adventure” decorating plan. Each kid got a piping bag and a job—Noah handled ganache (meticulously!), Emma added sprinkles like confetti, and Lily finished with flowers. It wasn’t perfect—but it was perfectly ours.
Flavor Variations to Try:
• Mocha twist: Add 1 Tbsp espresso paste to buttercream
• Raspberry ripple: Spread raspberry jam under each sponge layer
• Caramel dream: Swap ganache filling with thick salted caramel
• Chocolate sponge base: Sub ¼ cup flour with cocoa powder
• Strawberry fluff: Fold in crushed freeze-dried strawberries to buttercream
If you’re looking for a playful design, try my Labubu cake tutorial—it’s whimsical, kid-friendly, and pairs beautifully with this base recipe.
Make-Ahead, Storage & Freezing
One of my favorite things about this sponge buttercream ganache cake? You don’t have to make it all in one go. Spacing things out makes it feel so much more doable—especially if you’ve got a busy weekend, a birthday, or a party coming up.
My Favorite Weekend Timeline:
Friday Night:
• Bake sponge layers
• Cool, wrap tightly in plastic, and refrigerate or freeze
Saturday Afternoon:
• Make Swiss buttercream
• Stack and fill the cake
• Do a crumb coat + chill
Sunday Morning:
• Add final coat and ganache drip
• Decorate + serve!
Eva’s Note: I’ve used this exact method for a cousin’s small wedding. I baked Friday, stacked and frosted Saturday, and did the ganache drip Sunday morning before church. Zero stress, total wow.
Storage Tips:
• Assembled cake: Keep chilled, loosely covered in the fridge for up to 3 days. Let sit at room temp 30 minutes before serving.
• Unfrosted layers: Wrap in plastic + foil, freeze up to 1 month.
• Leftovers: Slice and store in airtight containers. You can even freeze slices—great for surprise sweet cravings!
Need more ideas for make-ahead desserts? Check out my pecan pie lasagna dessert—another crowd-pleaser that loves to chill.
Serving Suggestions & Pairings
This sponge buttercream ganache cake is rich, fluffy, and a little fancy. So whether it’s the centerpiece of a birthday table or a sweet end to Sunday dinner, it’s worth pairing with something that complements—not competes.
Serve it with:
• Hot drinks:
- Strong brewed coffee or espresso
- Chai tea (spiced, not too sweet)
- Steamed milk with vanilla or cinnamon
Eva’s Note: My dad swears this cake tastes best with a latte. He calls it his “Saturday café moment,” even if it’s just him and a chipped mug in our backyard.
• Fresh fruit:
- Raspberries or strawberries (add brightness)
- Sliced pears or figs (in cooler months)
- A side of fruit compote or berry sauce for drizzle
• Whipped cream or crème fraîche:
- For those who like things a little less sweet
- Add a dollop beside each slice for contrast
• Light dessert wine or sparkling water with lemon:
- If you’re serving this at a special event or brunch
Troubleshooting Corner
Things don’t always go to plan—and that’s okay. Here’s a quick guide to help rescue any hiccups with your sponge buttercream ganache cake.
Rapid-Fire Fixes:
Q: My ganache is too runny!
Let it cool longer. Warm ganache drips too far. Aim for 85 °F.
Eva’s Tip: Pop it in the fridge for 5 minutes, then stir. Repeat if needed.
Q: The sponge turned out dense.
Check your eggs—did you whip them long enough? Was your flour measured correctly?
Reverse-creaming helps, but egg volume is key!
Q: Buttercream looks curdled.
Keep mixing! It usually comes together. If it’s too cold, warm the bowl slightly over a pot of steaming water and beat again.
Q: Ganache drip won’t stick.
Your cake may be too cold—or the ganache too cool. Let both come closer to room temp. Try a test drip on the side first.
Q: My layers are sliding!
Revisit the dam ring, chill time, and central dowel. Chill between steps, and use a lazy Susan if you have one.
Eva’s Note: That Cinnamon Toast Crunch apple dump cake may be rustic, but even it benefits from a chilled crumb coat. So will this.
Frequently Asked Questions about Sponge Buttercream Ganache Cake
Can I mix ganache and buttercream for cake?
Yes! Let your ganache cool to around 75 °F, then fold 2 parts ganache into 3 parts buttercream.
Eva’s Note: Noah calls it “truffle frosting” and claims it’s the best thing I’ve ever made. High praise from a 12-year-old with strong snack opinions.
Can you put ganache on a sponge cake?
You bet. Just chill the crumb-coated sponge for 20 minutes before dripping the ganache. That way, the warm ganache sets instantly instead of soaking in.
Eva’s Note: We once served this cake at a winter party, and the glossy ganache raced down the sides like chocolate sleds. Totally magical.
Will buttercream slide off ganache?
Not if the ganache is fully set. Let it cool to about 65 °F, then pipe a thin buttercream “dam” ring before stacking your next layer.
Eva’s Note: I learned this trick after a summer picnic mishap. A fridge nap saved the day—and the cake.
Is ganache better than buttercream for cake?
They’re both stars! Ganache gives a rich, sleek finish. Buttercream adds lift, lightness, and flavor flexibility. Together, they’re the dream team.
Eva’s Note: Like my kids—one bold, one sweet, and always better together.
What is the secret of good ganache?
Use equal weights of high-quality chocolate and hot (not boiling) heavy cream. Stir from the center out, then let it cool to 90–85 °F before using.
Eva’s Note: My grandma always said, “Shiny ganache whispers, never shouts—stir slow!”
Sponge Buttercream Ganache Cake Recipe
- Total Time: 4 hours
- Yield: 12–14 servings 1x
- Diet: Vegetarian
Description
A tall, fluffy sponge buttercream ganache cake made with airy vanilla sponge, silky Swiss meringue buttercream, and a rich chocolate ganache drip—perfect for celebrations and birthdays.
Ingredients
8 large eggs, room temp
1 ¾ cups granulated sugar
2 cups cake (or all-purpose) flour, sifted
2 ½ tsp baking powder
½ tsp fine salt
6 Tbsp unsalted butter, melted and cooled
2 Tbsp warm whole milk
2 tsp pure vanilla extract
6 egg whites (≈ 180 g)
1 ⅔ cups granulated sugar
1 ½ cups unsalted butter, cubed, 65–70 °F
1 tsp vanilla extract
Pinch of fine salt
12 oz bittersweet chocolate (60–70%)
12 fl oz heavy cream (for drip)
4 oz bittersweet chocolate
2 fl oz heavy cream (for thicker filling)
Instructions
1. Preheat oven to 350 °F (175 °C). Grease and line three 8-inch cake pans.
2. Warm eggs in a bowl of warm water for 5–10 minutes to help them whip higher.
3. Whip eggs and sugar on high for 6–8 minutes until thick, pale, and tripled in volume.
4. Sift flour, baking powder, and salt into a bowl and set aside.
5. Melt butter, then stir in warm milk and vanilla; let cool slightly.
6. Mix sifted dry ingredients with the melted butter mixture until sandy.
7. Fold in whipped eggs in three additions until fully incorporated and airy.
8. Divide batter evenly between the pans, tap gently to remove air bubbles.
9. Bake 22–25 minutes or until the tops spring back and a toothpick comes out clean.
10. Cool layers in pans for 10 minutes, then invert onto racks and cool completely.
11. Make buttercream: whisk egg whites and sugar over simmering water until smooth and warm to the touch.
12. Whip until stiff peaks form and bowl is cool, then beat in cubed butter slowly.
13. Add vanilla and salt; whip until smooth and silky.
14. Make ganache: pour hot cream over chopped chocolate, let sit, then stir until glossy.
15. Cool ganache to 85 °F for drip or 75 °F for mixing with buttercream.
16. Pipe buttercream dam around sponge layer, fill with ganache or mixed ganache-buttercream.
17. Stack remaining layers, repeating dam and fill, then apply thin crumb coat and chill 20 minutes.
18. Finish with smooth coat of buttercream and pour ganache drip around the top edges.
19. Decorate as desired, chill cake, and let sit at room temp 30 minutes before serving.
Notes
For best texture, chill layers before stacking and let ganache cool to proper drip temperature.
The cake can be made in stages: bake sponge one day, assemble and decorate the next.
Mix ganache into buttercream at a 2:3 ratio for a delicious truffle-like filling.
Add espresso powder or freeze-dried fruit to flavor your buttercream twist.
- Prep Time: 1 hour
- Cook Time: 25 minutes
- Category: Dessert
- Method: Baking
- Cuisine: American
Nutrition
- Serving Size: 1 slice
- Calories: 540
- Sugar: 38g
- Sodium: 170mg
- Fat: 34g
- Saturated Fat: 21g
- Unsaturated Fat: 11g
- Trans Fat: 0g
- Carbohydrates: 52g
- Fiber: 2g
- Protein: 7g
- Cholesterol: 150mg
Thanks so much for baking with me—your kitchen just gained a new showstopper. For more comforting layer cakes and cozy dessert ideas, come follow along on Pinterest.